Welcome to the Open Sesame DIY escape room site. Here you will find
advice, tips, and ideas to create an escape room in your very own home.
What is an Escape Room?
An escape room is an interactive game where a group of players work
together to solve a sequence of puzzles to “escape” their current
environment or complete some other themed objective. The players are
“trapped1” in a room with a theme and given a dire scenario that
they must solve (e.g. “You are trapped in a dungeon facing eminent
execution,” or “Deadly aliens have boarded your spaceship and are coming to
eat your heads.”)
What makes an escape room unique is that the puzzles to be solved are
integrated into the physical room(s) the players are in. Locks click open,
containers offer new objects to manipulate, and doors open to new spaces to
explore. All these supply an immediacy and importance to the puzzles being
solved.
Commercial vs. DIY Escape Rooms
There are thousands of establishments throughout the world providing escape
room games. If you live in an urban area, chances are there is an escape
room near you. For a fee, you and a group of friends can be immersed in an
escape room of themed construction for a truly immersive environment. The
room’s design and puzzles can be especially intricate. Considering it can be
used around 8 times a day for many years, extra expense can be used to
custom build the room.
In contrast, a DIY escape room is a makeshift escape room in your home (or
other conveniently available space). Your improvised escape room won’t have
the customized set of a commercial escape room (unless you really like set
construction), but with a bit of imagination, you can replicate the same
experience in your own home.
Why DIY Escape Rooms?
Given the abundance commercial escape rooms, why go through the trouble of
making your own? There are several reasons, actually.
Customize for the players
Although commercial escape rooms come in many themes and difficulty levels,
they are ultimately designed for a general audience. In contrast, when
creating a DIY escape room at home, you will probably know exactly who the
players will be. This allows you to customize the game for them.
Making an escape room for a children’s birthday party? Simplify the puzzles
and throw in some fun activities. Making an escape room for a group of
friends that have done many before? Expand on the puzzles you all already
know and add an added level of complexity. Do the players share a common
interest or knowledge (such as a particular movie or TV series)? Build a
room and puzzles around that.
Cost
A commercial escape room will run well over $100 USD for a 1 hour group
activity, which makes it not cheap. In contrast, a DIY escape room can
potentially be constructed from materials around the house.
I won’t promise that a DIY escape room is free (even discounting the
personal time it will take to prepare the room). You will probably need to
purchase some locks to get started. And I do find myself spending some
money each time buying parts for physical puzzle items. But ultimately,
your budget is controlled by you, so you can spend as little or as much as
you like.
Play with any group size
To maximize their profit, a commercial escape room tries to maximize the
amount of people playing at one time. This is typically done by imposing
minimum group sizes or combining strangers from independent groups
together.
So with a commercial escape room you are likely to participate with a party
of 8-10 people. Unfortunately, with a group that large some people are
inevitably going to miss out on much of the puzzle solving.
With a DIY escape room, there is no real incentive to bundle large groups.
The DIY escape room works just as well, if not better, for a small group of
friends. In fact, groups can be broken up based on skill level, so that
less advanced players have more chance to participate.
No time limits
A commercial escape room is booked several times throughout the day. That
means that there is a finite time players can use the escape room before it
has to be cleared out and reset for the next reservation. Consequently,
players are given a time limit (usually 1 hour) to solve all the puzzles.
If the players need more time, then they fail and are kicked out, which
makes for a much less satisfying experience.
A DIY escape room has no such limitation. Players can be given enough time
(and hints) as necessary to complete all the puzzles. Regardless of skill
level or luck, the players can always be given the satisfaction of
completing everything.
You can always make more
Even if you have the money to regularly go to escape rooms, you will still
be limited by the escape rooms available. Escape rooms have low
replayability, and new escape rooms are slow to be built. Eventually, you
will run out of escape rooms to try in your area. DIY escape rooms are
limited only by your imagination.
Trapped at home
I originally got started with DIY escape rooms during the global COVID-19
pandemic. During this time, many communities such as my own were under
mandated lockdown, and all commercial escape rooms were closed. But a DIY
escape room does not require you to leave your house. So, it is a great
activity for those times when you are forced together.
Although escape rooms frequently feature a scenario where
players are trapped in a space, never actually physically restrain or
lock players in a room. All participants should be capable of
evacuating in case of emergency. ↩︎
Subsections of Open Sesame
Getting Started
Ready create your own escape room? This page goes over the basics to get
you started.
Anatomy of an Escape Room
Before we jump into discussing designing the particular elements of an
escape room, let us first consider the overall structure of the design. If
you have participated in an escape room, at any time you were probably
thinking in terms of the things you found and the locks you had to open.
But when designing an escape room, it is helpful to think of the structure
in terms of rooms1 and boxes.
A room is, well, a room. It is a space in which players can roam. It also
contains clues, items, and boxes as well as potential passages to other
rooms and the exit. Boxes are containers that likewise contain clues and
items.
Both rooms and boxes are opened by solving a puzzle that allows them to be
opened (except, of course the room the players start in). From a design
standpoint, rooms and boxes are very similar.
Once the rooms and boxes have been decided on (we will get to how to do
that shortly), the elements can be arranged in a flow diagram that
specifies the order in which players must solve them. Here is an example of
how an escape room might be structured.
What makes organizing your escape room this way so important is that it
allows you to ensure that the arrangement of items in your escape room is
correct. In particular, the arrangement of items in your escape room
must follow the following 2 rules.
The puzzle for any box or room must need only items that are
accessible without the items in that box or room.
It should not be possible to open a box or room before its time.
Of these 2 rules, the first is the most important. If it is broken, the
escape room cannot be solved. In the example above, Box 1 better not
require an item that is located in Room 2. If that is the case, then the
players will never be able to progress because they need Room 2 to open
Box 1 but need Box 1 to open Room 2. Avoiding this situation is easy
with the flowchart. Simply ensure that all the items required for the
puzzle of any given box or room are located in an earlier node.
The second rule is a bit less important because violating it at least
doesn’t get the players stuck. Still, you don’t really want the players to
be able to open the exit without solving all of the previous puzzles. Also,
the story comprising your escape room might make less sense if things are
opened in the wrong order. And there may be cases where 2 locks need to be
opened in a certain order. You should make sure the second cannot be opened
before the first. This can be verified by making sure that the puzzle for
every box and room requires at least one item from every node pointing
directly to it.
Although the full flowchart is useful, in truth I rarely ever draw out the
whole thing. It is simply too inconvenient during the design process when
the structure is constantly shifting. Instead, I usually just write things
out in a linear outline. The outline is a simple ordered list of rooms and
boxes, like this.
Room 1
Items
Item 1
Item 2
Box 1
Puzzle
Do X with item 1
Do Y with item 2
Items
Item 3
Item 4
…
An outline like this is easy to edit in a text editor or word processor.
Also, it is easy to verify rule 1, any box/room needs items only from
accessible boxes/rooms. To verify this, simply search each item in a puzzle
and verify that it occurs earlier in the document. Rule 2, verifying that
you cannot open a box/room too early, is a bit harder without the
explicit flowchart. But you can once again check where the items that each
puzzle requires are revealed and make sure that at least one of the items
appears in a room or box that should be open first.
The Plot
Right now you might be thinking, Plot? I want to make escape rooms, not
write stories. We’re already 3 pages into this stupid web site and we’re
still talking about things like plot.
I admit that on the first time I set out to make an escape room, I didn’t
give much credence to the story. But what I found is that the story is
important for a couple of reasons. First, the story provides purpose for
the players. It is what elevates the game above a simple puzzle collection.
Second, constructing the story early helps with the overall design of the
escape room. The plot points of the story form the aforementioned rooms and
boxes that structure the room. I’m constantly surprised how, once I come up
with the basic plot structure, how quickly the rest of the escape room
comes together. Simply having an idea of what each room and box will mean
helps come up with creative ideas.
That’s not to say that the design of the escape room should be a linear
process. After outlining the basics of the plot, I find it most useful to
bounce back and forth from puzzle design to plot refinement and back. The
plot points can provide inspiration for clever puzzle designs. And the
design of puzzles can provide interesting refinements for the plot.
The Puzzles
Yes. Finally. The puzzles. The best part of any escape room.
The puzzles can be pretty much anything. And, of course, you’ll find lots
of suggestions on the puzzles pages here. But, remember as you
design puzzles that you are not creating the same variety of puzzles that
you might find in, say, a book of crossword or Sudoku puzzles. So, here are
some features of the best escape room puzzles.
Lateral Thinking The best escape room puzzles are solved with a bit
of lateral thinking. The puzzles comprise a collection of items and
clues that on face value have no particular significance. But when
looked at differently or put together in the right way, a secret
meaning is revealed.
Shortness The mechanics of the puzzle should not take a long time
to complete. Players might take a long time to figure out to solve a
hard puzzle, but once they achieve that “ah-ha” moment, the answer to
the puzzle should be quick and self evident.
Uniqueness Each puzzle in the escape room should be unique. In
fact, none of the players should have ever seen any of the puzzles or
anything like them.
When starting the puzzle design for your escape room, it is good to start
by browsing puzzle suggestions from this site and others while
keeping these features in mind. You can also get inspiration from any
commercial escape rooms that you have done. As you think about potential
puzzles, it is a good idea to keep a list of potential ideas, even if you
do not yet have an idea where you will use it. You never know when
inspiration will hit, and it is good to jot down ideas as they come before
they are forgotten.
The Space
As you are designing your escape room, consider the space in which you are
going to construct it. Presumably, you are going to repurpose one or more
rooms of your house or other living space to do it.
You have probably noticed that in the general descriptions I have given so
far, I often refer to multiple rooms. There is something pleasant about
opening new spaces midway through the game. It keeps the game fresh and
gives a nice indication of progress. That said, you are in no obligation to
use more than one room if you so choose.
If you do decide to use multiple rooms, consider the options in your
dwelling and decide how the players will move from one room to the next.
Perhaps you are fortunate enough to have two adjacent rooms with a
connecting door, which simplifies things. If you don’t have such a spot,
you may need to improvise.
If you don’t have 2 adjoining rooms, don’t fret. DIY escape rooms are all
about improvising. Perhaps you can find 2 rooms that are separated by a
short walk down a hallway or by a jack-and-jill bathroom. You could
potentially work the separating space into the escape room, or simply
instruct the players to ignore things in between the rooms. Another option,
if you have a large enough room, is to divide it into parts. One simple way
to create a partition is to hang sheets from the ceiling or a clothesline.
Chances are, the rooms you are using are not empty. They will have
furniture — tables, sofas, shelves, and the like. Some of these elements
can be incorporated into the game if they fit. Otherwise, they can be moved
off to the side. You can cover them with a sheet or simply instruct players
they have no relevance to the escape room.
Playing the Escape Room
Once you’ve designed your escape room, built all your puzzles and props,
set up everything in your rooms, and tested to make sure everything works,
you are ready to play the game. The game operates with a proctor (that’s
you, the designer of the game) and some number of players. 1-4 players at a
time usually works best.
The proctor starts the game by going over the instructions of the game.
These establish the ground rules. This will include some basic escape room
stuff, like what type of locks are being used and how they are operated.
But you will probably have extra instructions due to your improvisations.
For example, I often lock boxes and doors using padlocks attached to
string, so I always instruct the players to not untie any of the string;
rather all puzzles should be solved by opening the padlock. This is also a
good time to let players know of anything not part of the game (e.g.
ignore anything in the cabinets).
With the rules out of the way, the proctor then describes the scenario. My
preference is to keep this description short by telling the players only
who they are, where they are, and what they are immediately doing.
Something like, “The group of you have been summoned to your recently
departed uncle’s old mansion at the top of the hill. You all stand to
inherit a small fortune, but no one has yet found the will. Your lawyers
have urged you to come here in hopes that you find the will and avoid a
lengthy legal battle.” Remember that an escape room is also an interactive
story, so the plot should progress and the stakes should be raised as the
players progress (e.g. the will you find stipulates you must spend the
night to inherit the fortune; you find that the mansion is actually filled
with deadly traps; you discover that your uncle was deep into the occult
and plans to sacrifice your souls to return to an immortal life).
From here on out, the players run the game. The proctor sits back and
quietly monitors the players. One of the functions the proctor should
perform is to ensure that the players do not accidentally (or intentionally)
circumnavigate or break the puzzles. To win an escape room, players need to
explore aggressively and use items in unconventional ways. That could lead
players to do things you had not anticipated. For example, I once had a
puzzle involving a key trapped in a mechanism that required a secondary
object to fetch the key out. Instead, one of the players picked up the
mechanism and shook out the key. Oops, that was missing the point. So, I
said that, no, the mechanism is supposed to be affixed to the table, and
you cannot lift it up. Then I reset the puzzle so the players could try
again.
The other major function of the proctor is to provide hints when the
players get stuck. Hints should be given sparingly; the big fun of playing
an escape room is solving the puzzles. I personally find that after going
through the setup for the game, I have a hard time keeping quiet about the
puzzles, so I have to concentrate on sitting back and watching.
That said, the escape room gets frustrating if the players cannot figure
out a puzzle. Once all the players agree that they need a hint, give one.
Try to give a hint that nudges the players in the right direction without
giving the solution outright. For example, if the players are struggling to
decode a message, a hint might be to look for clues displayed around the
room to help direct them to the item posted to the wall that provides the
decoder.
Although the proctor does not get to play the game (you already know all
the answers), administering an escape room is a fun and rewarding
experience in its own right.
You may notice that the word “room” is being overloaded here. The
game that is colloquially refereed to as an “escape room” often
actually comprises multiple physical “rooms”. To be clear, we are using
the phrase “escape room” to refer to the game as a whole whereas the
single word “room” means a specific partition of the space. ↩︎
Equipment
This page lists some of the basic equipment that you will need to construct
a basic at-hoe escape room. The first items are required, but cheap and can
be improvised, so you can probably build the escape room with items lying
around your home.
The later items are things that are helpful, but relatively expensive. If
you have them, great. If not, don’t fret.
Note that although in some cases there are suggestions on equipment that
you can use, I have no affiliation with any of these items or their
manufacturers.
You don’t need a 3D printer, but if you have access to one, you can fabricate items quickly.
Subsections of Equipment
Locks
What would an escape room be without locks? The puzzles the players solve
culminate in the opening of a box or door. Any interesting escape room is
going to have 5-10 locking mechanisms, and padlocks are the easiest type to
use.
Chances are, you don’t have quite this many padlocks lying around.
Fortunately, you’re not using them to really secure anything value. The
locks are more symbolic than anything else. So for less money than it would
take to go to a commercial escape room, you can buy enough locks to build
your own (or use the makeshift solution at the end).
Digit Locks
Often, it is easiest to create puzzles that make numbers, so most of the
locks I use are number combination locks. You will want something where you
can set your own code (most digit locks let you do this).
Simple luggage padlocks will do the trick. I have had good luck with these
luggage digit padlocks. They are cheap, but they are easy to set a code
and ar unambiguous when you dial in the code. As an added bonus, the dials
have different colors, which you can work into clues (but keep in mind that
the colors are not in a consistent order).
Word Locks
To make things more interesting, it is fun to incorporate code words into
the puzzles. For this, you need a padlock that uses letters instead of
numbers.
There are multiple such locks available. I have a love-hate relationship
with the Master Lock word combination padlock. The construction is solid
enough for a puzzle (I’ve seen them used in commercial escape rooms many
times), but the stupid thing doesn’t come with enough letter dials to
actually form words. (It has 5 dials, but only comes with 4 dials with
letters.) To make interesting words, you really have to buy two or more to
mix and match dials. But if you are willing to buy 2 (use one for words and
one for numbers), they work quite well.
Directional Locks
Master Lock sells a directional lock that has a knob on front that you
push up/down/left/right to form a pattern. You can set it to your own
combination of movement, but be careful because I managed to jam up (and
hence destroy) one of these locks trying to set the pattern.
A directional lock lends a nice change to the code representation, but it
tends to be a little tricky to represent directions in a puzzle. I’ve never
seen more than one used in any escape room.
Unfortunately, at the time of this writing, Masterlock has discontinued its
production of directional padlocks, and so far no other company is producing any
replacements. If you cannot get a hold of a physical directional lock consider
this alternative approach.
Key Locks
You can also use locks that open with a key. Key locks are available in
just about any size you need.
You may find that you don’t use key locks as much as you would expect.
There is not a lot of point in putting keys in boxes, since you have just
solved a puzzle to remove the lock for the box the key is in. So keys are
typically used in situations where they are hidden. Another situation might
be that the physical constraints of a puzzle require a container too small
for items it reveals, so you provide a key to the “real” box.
Paper Locks
Honestly, you don’t need physical locks. You could just put a note on a
container or door that says do not open until you give the game master the
correct code.
But there is something visceral about using a physical lock. The
anticipation as the dials click and the cha-chunk when the lock finally
opens. I think that adds enough value to justify using the physical locks.
Containers
Once you have locks, the next thing you will need is stuff to lock up. Any
escape room is going to make use of several containers (i.e. “boxes”) that
hold items providing clues to the next puzzle.
A commercial escape room builds most of these boxes into the room’s set.
How elaborately you wish to match the boxes to your theme is up to you.
Most likely you already have many containers like luggage, backpacks,
cases, and storage cases. Even cardboard boxes can be leveraged.
String
It is always good to have some string on hand when setting up your escape
room. Your escape room will almost certainly require some amount of
juryrigging, and some type of string or rope will probably be required.
One of the most common needs for string is attaching locks to something
that needs to be locked. Chances are, the doors in your room do not have a
convenient, settable combination lock. So, you will probably have to attach
a padlock of the appropriate type, which will probably involve attaching a
string to the knob or across the door. Likewise, some of your containers
may not have convenient attachement points for locks, so string can often
be used to force an attachment.
When using string, you may want to tell players as part of the rules that
they are not to untie strings. None of the puzzles will involve untying
knots.
Printer
Any escape room is bound to have numerous notes, instructions, and labels.
Creating these items is usually easier and faster with a computer and
printer. If you don’t happen to have a printer handy, you can instead write
and draw these things by hand.
Internet
Although not really practical for a commercial escape room, the internet is
a handy resource to incorporate into a home escape room. Email and web are
so integral in today’s life that putting part of the materials online is a
fun and easy way to make puzzles more interesting. Just have the players
bring in their smartphones to access puzzles and clues you put on the
internet. Here are some free resources to set that up.
QR Codes
A QR code is the name for those square computer codes like that shown here.
They are very convenient for taking a smartphone to a specific web site.
With the most recent versions of iPhone and Android, you can just point the
camera at the QR code, and you can tap right to the QR’s web page. QR codes
are a convenient way to take players to an online clue or puzzle.
There exist many free QR code generators. Just search the web for them.
The one I used was QR Stuff because it provides a service to shorten the
URL to make more robust codes.
Online Documents
To incorporate the web into your puzzles, you will have to create online
content. You don’t have to be an expert in web site design to create
content. There are very simple ways to post something. A very simple way is
to post a document online.
Google Docs is a convenient way to create an online document. Simply
write the document in your browser, and then share it to get a URL to view
it. Then use the aforementioned QR code generators to get players to that
URL. Alternately, there are other file storage sites that allow you to
share files such as Dropbox, OneDrive, and many others.
Web Site Builders
Simply posting a document might not look as nice as you would like. A
page-based document won’t reformat itself for view on different mobile
devices. A simple HTML-based web page might look nicer.
There are lots of ways to build web pages. If you happen to know how to
create your own web pages, that’s a great way to make content. But if you
are not experience in web page building, don’t worry. There are lots of
free easy tools available to create content.
Web page builders range from simple editors without a lot of control to
complex. A good place to start is Google Sites, which is easy, but does
not give you a lot of control.
Forms
Instead of writing a code into a lock, a puzzle can involve entering the
correct response into a web form. Once again, rather than writing your own
HTML code to create a form, you can use one of the numerous online form
builders. Google Forms has a nice feature that allows you to “validate”
responses that players have. Another nice feature is that you can embed a
Google Form inside of a Google Site so you can mix form and other HTML
elements.
3D Printer
To be clear, you do not need a 3D printer to create an escape room.
Although there are many affordable options, 3D printing is a hobby onto
itself.
If you happen to have access to a 3D printer, it can be helpful to
fabricate items as you need them, which can make life easier. If you have
one, you will probably use it. But if you don’t, it will still be possible
to find, buy, construct, or jury-rig everything you need for a great at
home escape room.
One particularly useful thing I have found to print are latches that can
be used with padlocks. It is convenient to scale and print these to the
type of padlocks you have and then glue them to makeshift containers like
cardboard boxes. Again, you don’t need a 3D printer to create these. You
can probably find something similar at your hardware store or just
improvise by wrapping string around the box connected with the lock. But
if you have the printer, it can simplify things.
Puzzles
The puzzles are the best part of any escape room. The puzzles used for an
escape room tend to differ from those you might find in, say, a book of
crossword or Sudoku puzzles. Where the mechanisms to solve a crossword
puzzle are roughly the same from one to the next, each escape room puzzle
is different. You won’t know how to solve an escape room puzzle at first;
you might not even recognize it as a puzzle right away. The trick to the
best puzzles requires lateral thinking to use objects and information in
abnormal ways.
These pages provide suggestions on puzzles you might use for your own
escape rooms.
Players must “sketch” a pattern on a directional lock.
Subsections of Puzzles
Hidden Messages
One of the most common escape room puzzles is a message or code hidden in
what otherwise looks like a normal note. The basic approach is to
differentiate some subset of the letters or words. Experienced players
learn to look for idiosyncrasies in any text they see.
A meaningless message reveals a clue when paired with a separate list of code words.
Subsections of Hidden Messages
Highlight Letters
Hide a message in a note by highlighting letters that spell out a secret
code. The basic contents of the note itself just give some information
about the plot. But some of the letters in the note are clearly
highlighted and spell out a secret message or code.
Consider the following ominous note that players find.
Greetings adventurers!
Welcome to fantasy atoll. Make yourselves at home.
Don’t panic. Perchance some of you will survive.
Note the bold highlighting of some of the letters. If we write these out, we
get “ten four nine”. This could be the combination for one of the locks in
the room: 1049.
The highlighting can be anything that distinguishes letters from others. In
this example the letters for the code are darker than those around them.
Other cues, such as color or background could be used. What is important is
that the highlighted letters are easily distinguished from the other
letters.
Because the highlighting is meant to be clear, this type of puzzle is
usually easy to solve. This is a good introductory puzzle for novice
players. See the other forms of hidden messages for more subtle ways of
hiding codes.
Capital Letters
Instead of highlighting letters
using a change in font, another way to hide a message in a note is to use
capitol letters.
The note is fairly normal, but the capitol letters do not follow correct
grammar rules. Instead, the entire message is in lowercase except capitol
letters that spell out the secret message.
i have been happily married to my huSband for many yEars now. yet, i haVe
the biggEst secret a persoN can have. thuS i fear every day someone wIll
eXtricaTe thE truth.
now the lifE of my family is in daNger. i musT now do sometHing dRastic.
tomorrow it will all be ovEr, one way or anothEr.
Collecting the capitol letters, you get S E V E N S I X T E E N T H R E E.
Splitting the words, the code is seven sixteen three (7163).
Numbers for Letters
A numeric code is easy to hide in a message by replacing some of the
letters in the message with numbers. Several letters look similar to one of
the numeric digits, so they can be subtly replaced.
Captain’s Log
The starship Faustus r3ached the outskirts of Alpha Centauri only to make a
trou8ling discovery. We have encountered life fØrms free floating in space
r4ther than bound to a planet. The organi5m we dubbed “death worm” has
already terminated over a quarter of the crew.
In the above message there are 5 numbers, which list out the code 38045.
Hiding a code like this is easy, especially when using all caps in the
message. The following table, adapted from leet, provides some suggested
substitutions.
Number
Letters it can replace
Ø
O, Q
1
I, L
2
Z
3
E
4
A
5
S
6
G
7
J, T
8
B, X
When substituting a number digit for a letter, it is important to be able
to distinguish the two. Otherwise, it will be impossible for the players to
solve the puzzle. You may need to add distinguishing features. For example,
a zero is indistinguishable from an “O”, so you will need to add a slash to
the zero (i.e. Ø).
This puzzle tends to be easy to solve. A variation to make this more
challenging for experienced players is to spell out one of the digits
instead of using this substitution. Here is a message I once used.
The fire has been called Øff, my friend. No one is coming to h3lp you. You
might as well come out and join the others. I promise I won’t hur7 you.
The players quickly found the code 037. But that did not fit any of the
locks. The difficult part of the puzzle is to recognize that the word “one”
is part of the message. Inserting a “one” into the digits, you get the
proper code 0137.
Number Words
A numeric code can be hidden in a message by writing a message that has
numbers as part of it. Here is an example.
Good job! You have reestablished my connection to our communication and
research notes. Since General Halftrack isolated me 3 days ago, I have
been desperate for help.
I need you to find the formula to the virus treatment that I developed
merely 2 days before I left for this emergency trip.
These 16 weeks on the road have been exhausting, and I’m so glad to be
able to talk to you again.
On reading this note carefully, you will notice that there are three
numbers that are part of it, taking the place of words: 3, 2, and 16.
Concatenating these numbers together we get the code 3216.
In the previous message, the numbers are highlighted by representing them
numerically. For an extra challenge, write out the numbers as words.
Good job! You have reestablished my connection to our communication and
research notes. Since General Halftrack isolated me three days ago, I have
been desperate for help.
I need you to find the formula to the virus treatment that I developed
merely two days before I left for this emergency trip.
These sixteen weeks on the road have been exhausting, and I’m so glad to be
able to talk to you again.
Rotated Letters
Spell out a secret word by rotating or flipping letters. Most of the
letters will be normal, but some will be placed in a weird orientation.
In the message above, an observant reader needs to see that there are 5
letters upside down. They spell out “cream”, which could be a secret
password.
Using rotated or mirrored letters can be tricky. You need to make sure to
use letters with enough asymmetry to be able to tell the transformed
letters from normal ones. Letters like “o”, “x”, and “l” will be difficult
to see.
Because letter options are often limited, another way to use
rotated/flipped letters is simply change one letter of words to include in
the secret.
In this message, there are upside-down letters in the words thirteen, one,
and two, revealing the code 1312.
One way to create rotated letters is to use special characters of flipped
letters, which can be copied from special Unicode characters. But a more
versatile way to do it is to rotate or flip images of characters in an
image editor.
Misspellings
Hopefully, as you create notes and other material for your escape room, you
are doing some proofreading to ensure that the language is correct. But,
sometimes you can intentionally introduce mistakes to highlight words that
add up to a secret message. One simple such mistake is a misspelling of a
word.
As I awoke, there appeared before me a body of pure light. “Loook upon me,”
it said, “and hear my words.”
“What do you want?” I stammered
“You have been selected for a quest,” it said. “You must travel over the
highest mountains and undr the thickest forest canopies. Go to the temple
of peace and find the chairrs of the five kingdoms.”
Look closely at this note and you will see that there are exactly 3
misspelled words: loook undr chairrs (look under chairs), which gives a
clue on where to find an important item.
Make sure that your misspellings are egregious (that is, easy to spot) but
also unmistakable for the word they are supposed to represent. Players need
to be able to pick out the words but still be able to understand them. Keep
in mind the reading level of players. Young children or
English-as-a-second-language players are likely to have more trouble with a
puzzle like this.
Code-Word Lookup
For the code-word lookup puzzle, players need to put together two clues.
The first clue is the message itself. But the message alone does not have
any real meaning. To get the meaning, the players need to put the message
together with a second clue containing a list of code words and their
meaning (which may just be a digit for a numeric password).
Here is an example I have used. The players find an old diary with the
following entry.
Dear Diary,
Today was the best Day of my life. I met the man of my dreams: Todd. We met
at the park. He was walking his ferret. I was hiding in the bushes. He is
sooooo cute with his pouting Lips and big brown Eyebrows. I didn’t have the
courage to talk, but I did find out where he lives. Tomorrow, we’ll “meet”
again. I’ll bring Mr. Knife for luck.
This message alone does not provide anything of value. However, in another
box the players find this page from a scientific psychology paper.
Most of the text of this “paper” is nonsense. The important part is the
enumerated lists provided. To solve the puzzle, the players have to match
words in the diary message to the listed words in the paper and use the
associated numbers to build the passcode. (The message inappropriately
capitalizes these words to help players make this connection and pick out
the appropriate words.) The words to pick out are “Day”, “Lips”,
“Eyebrows”, and “Knife”, which correspond to the digits 4, 4, 8, and 2,
respectively. Thus, the passcode is 4482.
A variant of this method is the crossword lookup where instead of
providing the code-word lookup in a list, it is hidden in a crossword
puzzle.
Ciphers
A simple way to hide a message is to use a cipher to turn text into
gibberish. A cipher is a way to turn plain text into something
unrecognizable. When used as an escape room puzzle, the players get the
unrecognizable encrypted text and need to find and apply the appropriate
cipher to restore the plain text. Here are some ciphers appropriate for
escape room puzzles.
Leverage this alphabet for sightless reading to encode a message in a pattern of dots.
Subsections of Ciphers
Alphabetic Substitution
A very simple way to make a cipher is to create a table that substitutes
each letter with another letter. The table is simple. Make two rows of
letters: the first row with the letters in order and the second row with
the letters in a different order.
One common way of creating such a table is to simply rotate the letters for
the second row. (This specific type of alphabetic substitution is known as
Caesar cipher.) Here is an example of rotating by 5 letters.
A
B
C
D
E
F
G
H
I
J
K
L
M
N
O
P
Q
R
S
T
U
V
W
X
Y
Z
V
W
X
Y
Z
A
B
C
D
E
F
G
H
I
J
K
L
M
N
O
P
Q
R
S
T
U
When creating the encrypted text, look up each letter in the bottom row and
replace it with the letter in the top row. You end up with text like this:
YMJ UFXXBTWI NX GJQQDGZYYTS
Now, when players find this message and the cipher table, they can do the
reverse lookup and reveal the clear text.
THE PASSWORD IS BELLYBUTTON
You can choose any character mapping you like. For simplicity, you might
try the ROT13 system, which has the letters rotated 13 places.
A
B
C
D
E
F
G
H
I
J
K
L
M
N
O
P
Q
R
S
T
U
V
W
X
Y
Z
N
O
P
Q
R
S
T
U
V
W
X
Y
Z
A
B
C
D
E
F
G
H
I
J
K
L
M
The convenience of the ROT13 cipher is that the table works both ways.
Letter “A” transforms to “N” and letter “N” transforms back to “A”.
Likewise, “B” transforms to “O” and vice versa, and so on. This property
makes it less likely to make a mistake when encoding or decoding.
Another cipher with the same property can be formed by reversing the order
of the letters.
A
B
C
D
E
F
G
H
I
J
K
L
M
N
O
P
Q
R
S
T
U
V
W
X
Y
Z
Z
Y
X
W
V
U
T
S
R
Q
P
O
N
M
L
K
J
I
H
G
F
E
D
C
B
A
You can, of course, randomize the letters in any order that you wish. But
unless you think the players will guess the common cipher, that is likely
more trouble than it is worth.
One final note. Simple alphabetic substitution ciphers are known to be
breakable without the cipher table. In fact, newspapers often feature
“Cryptogram” puzzles that challenge readers to decode a quote encoded with
a random alphabetic substitution cipher. However, that should not be a
problem as it will likely be easier and more fun for players to solve by
finding the decoding table and using that. (If you are really worried about
it, make sure players find the decoding table first.)
On the other hand, you could force players to break the substitution cipher
without a table. But, frankly, this does not make for a good escape room
puzzle. Solving a cryptogram is time consuming and very difficult if you do
not have much experience with them. If you are into cryptograms, it is a
lot easier to get your fix with a puzzle book than to design a whole escape
room.
Symbol Substitution
The alphabetic substitution cipher replaces one letter for another
letter. But who says that the encrypted message has to use the same letters
or numbers as the plain text message? You can use completely different
symbols for the encoded message: hieroglyphics, Braille, emojis,
constellations, or anything else you can think of.
A symbol substitution works the as alphatbetic subtitution, just with
symbols. Here is a simple cipher example using symbols based on zodiac
signs.
♒
♈
♋
♑
♊
♌
♎
♓
♐
♏
♉
♍
A
D
E
G
H
N
O
R
S
T
U
W
A message is a sequence of these symbols. It may contain punctuation (as
long as it will not be mistaken for symbols).
And the decoding happens by finding each symbol in the table and replacing
it with the associated letter.
GO NORTH AND THEN WEST. THEN GO SOUTH, SOUTHWEST, AND EAST.
One of the nice things about using a symbol substitution cipher is that the
symbols can be unique and be used across multiple puzzles. Rather than give
the table directly, a seprate puzzle, like symbol algebra. And rather than
give a message of symbols outright, the symbols and order can be extracted
from another puzzle, like the grid lookup.
Pigpen Cipher
The pigpen cipher is a simple and well-known substitution cipher that
uses lined grids to define unique symbols for each letter in the alphabet.
There are several variants of the pigpen cipher, but a common substitution
table looks like this.
Each letter in the pigpen cipher is defined by the border of its region.
For example, E is in the middle of the grid, surrounded by borders, so it
is represented by a square. B, above it, has an open border on the top, so
it is represented by a box with an open top.
Ultimately, this leaves a code that looks like this.
,
.
Using the pigpen cipher above, the shapes can be matched to letters that
spell out this secret message.
AGENT Q,
THE DEAD DROP FOR THE MICROFILM IS BEHIND THE GREEN CURTAIN.
Because the pigpen cipher is quite well-known, there is a good chance that
players will already be familiar with it and will be able to decode a
message without a provided substitution table. Thus, consider providing the
decoding table before providing the message.
Morse Code
Morse code is the famous encoding of letters using a sequence of “dots”
and “dashes.” This code is useful to send a message using a mode of
communication that can only transmit on and off. The signal is turned on
momentarily for a dot and a little longer for a dash.
Morse code was originally used to transmit messages over an electric
telegraph in which a sender closed a circuit on one end to activate a
clicker on the other end. But Morse code can also be communicated with
beeps of sound or flashes of light.
Here is a table for the international Morse code.
A
⦁ ━
J
⦁ ━ ━ ━
S
⦁ ⦁ ⦁
B
━ ⦁ ⦁ ⦁
K
━ ⦁ ━
T
━
C
━ ⦁ ━ ⦁
L
⦁ ━ ⦁ ⦁
U
⦁ ⦁ ━
D
━ ⦁ ⦁
M
━ ━
V
⦁ ⦁ ⦁ ━
E
⦁
N
━ ⦁
W
⦁ ━ ━
F
⦁ ⦁ ━ ⦁
O
━ ━ ━
X
━ ⦁ ⦁ ━
G
━ ━ ⦁
P
⦁ ━ ━ ⦁
Y
━ ⦁ ━ ━
H
⦁ ⦁ ⦁ ⦁
Q
━ ━ ⦁ ━
Z
━ ━ ⦁ ⦁
I
⦁ ⦁
R
⦁ ━ ⦁
Although some people have memorized Morse code, most have not. So, you
should always provide the Morse code table unless you are very sure that the
players have memorized it.
Although you could provide a Morse code message on a piece of paper drawn
in circles and lines, the fun part of Morse code is to hide it in a beeping
or flashing item. This can be trickier to create than a simple printed
message or image. A straightforward way to provide a Morse code message is
to create an audio or video file that can be played on any number of
devices.
A fun thing to do with a Morse code message is to hide it in some unrelated
sight our sound. Spell the Morse code message in car horn honking, a dog
barking, or any other theme-appropriate repetitive sound. Or maybe that
flashing light on a buoy or satellite has a flashing pattern.
Players inexperienced with interpreting Morse code are likely to find the
task difficult. Therefore, it is best to keep the message short (one or two
words at most) and to give the code out slowly.
Braille
Braille is an alphabet designed to be read by touch rather than sight. A
“letter” in Braille is represented by a matrix of dots 2 wide and 3 high.
Braille is typically written by embossing paper or another material to
create some combination of bumps in this 2x3 pattern. This makes it
possible to interpret the letters by feeling the bumps with a finger pad.
A
B
C
D
E
F
G
H
I
J
K
L
M
⠁
⠃
⠉
⠙
⠑
⠋
⠛
⠓
⠊
⠚
⠅
⠇
⠍
N
O
P
Q
R
S
T
U
V
W
X
Y
Z
⠝
⠕
⠏
⠟
⠗
⠎
⠞
⠥
⠧
⠺
⠭
⠽
⠵
One way to force players to read a Braille message without looking at it is
to paste the embossed Braille inside of a closed box with a hole. To read
the message, players must reach a hand in through the hole and feel for the
message.
Although not the original point, Braille messages can also be read
visually. To make this more challenging, hide the Braille letters in
objects or images that naturally have grids. Here is an example of hiding a
Braille message in the windows of a skyline.
The image looks like ordinary drawing of buildings. But a closer look
reveals that all the windows are grouped in 2x3 grids like Braille letters
are. The lit windows encode in each of these grids a Braille letter,
spelling out “I Spy”.
Paper and Pencil
Puzzles like crosswords and word finds are a common feature in newspapers
and other periodicals. Such paper-and-pencil puzzles can be featured as
part of an escape room.
That said, escape room players probably have not come to simply solve
paper-and-pencil puzzles, which are readily available in books and the
internet. Rather, the escape room should add a twist to the puzzle. The
paper-and-pencil puzzle will likely be fairly simple because it is really
serving as a key to a more unfamiliar puzzle.
Here are some suggestions on how to turn a simple paper-and-pencil into a
puzzle to incorporate into an escape room.
The crossword lookup is a 2-part puzzle. In the first part the players
solve a crossword puzzle. The crossword puzzle should be easy because
really it is just a distraction. In the second part, the players have to
realize that the words in the crossword answers match a sequence of objects
or words elsewhere in the room. The players can then replace the words with
the number of the word in the crossword to get a number code. (This is much
like the code-word lookup puzzle except the word lookup is less obvious.)
Here is an example of how this puzzle might work. We could start with
providing this crossword.
Players need to solve this puzzle. Here is the completed crossword.
Again, the crossword should be easy to complete. You can provide some
answers before you start to help.
At first, solving the crossword does not seem to have helped. But, the
second part of the puzzle is a sequence of items. For example, this shelf
of animal figurines.
On this shelf are 4 animals in the following order: dolphin, rabbit,
dragon, and seal. The trick is to recognize that these words are also in
the crossword. As with any crossword, each word has a number
associated with it. In this case, dolphin is clue 3, rabbit is clue 1,
dragon is clue 2, and seal is clue 6. Doing the word-number substitution we
get the code 3126, which can be used on a combination lock to open a box or
room.
Note that you will probably need to create your own crossword to implement
this puzzle with words that match what you are matching them to. Because
the crossword is meant to be simple, creating it should also be simple. To
help, you should be able to find several sites to create a puzzle from
words that you provide with a simple internet search.
Horizontal Fill In
In the horizontal fill in puzzle, players must fill in a list of words
based on clues and information about the escape room. When filled out, a
vertical column reveals a code word. This puzzle is similar to a crossword
lookup except the players are not expected to solve the clues with prior
knowledge. Instead, items in the room provide hints on the proper words.
The horizontal fill in puzzle starts with a piece of paper with a grid with
a clue along each row. One of the columns will have a bold box. Here is an
example of a horizontal fill in.
Given only this grid, there is no reasonable way the players can be
expected to fill it in. But as they explore the room, they will find
innocuous items that hint at the answers. One such item could be a business
card like the following.
The players might not know what a sommelier is, but the description at the
bottom should lead them to know that “Fortunato” is the “wine expert” of
the first line.
Likewise, there might be a portrait like the following on the wall.
The players need to make the connection that the “general” in the picture
fits the clue for the second line in the puzzle.
Once players find all the items around the room and make the connection to
the puzzle, they can complete the puzzle and get a result like this.
With the puzzle filled out, we can read a code word in the vertical column
with a bold outline: RAVEN.
Symbol Algebra
A symbol substitution cipher replaces a set of symbols/images/icons with
letters or numbers. But to ad a challenge to the puzzle, don’t simply give
the players the lookup. Make them work for it.
Hide a conversion from symbol to number in a simple math problem. This
takes the form of solving algebra, but with pictures instead of letters for
the variables. Here is a simple example.
🍗 + 🍗 + 🍗 = 12
🍗 + 🥖 + 🥖 = 20
🥖 - 🍮 = 7
🍮 + 🍗 + 🧀 = 7
🥗 + 🍮 - 🍗 = 0
Note that this problem is straightforward to solve. You don’t need a
technique like Gaussian elimination. The system is easily solved from the
top down.
The first line has 3 🍗 equal 12. Thus, 🍗 must be 4. The second line has
🍗 + 🥖 + 🥖 = 20. Thus, 2 🥖 sum to 16, and consequently 🥖 is 8. By the
third line, it is clear that 🍮 must be 1. From there, it is easy to get
that 🧀 is 2, and by the fifth line 🥗 3.
OK. The players have solved the puzzle. Now what? These values are not
useful until coupled with another clue. This could be coupled with any
puzzle that involves listing symbols in a certain order such as grid
lookup. Here is a simple example using a code-word lookup with a clue
containing a list of food for a meal.
Reception 5 Course Meal
Bread Assortment
Cheese Platter
Salad
Roast Chicken
Flan
To completely solve this puzzle, the players have to (1) solve the algebra,
(2) notice that the images used for symbols in the math are referenced in
the menu, and (3) list the numbers associated with each food symbol in the
menu’s order: 82341.
Word Find
A word find is a simple puzzle with a grid of letters and a list of words
hidden in the grid. Players need to find the sequence of letters in the
grid matching each word and encircle them.
The trick it to recognize that the bands around the words themselves form
a pattern to reveal a code.
Here is an example of a word find.
As with any word find, the target words are difficult to spot. With some
searching, the words can be found as follows.
Looking carefully, we can see the marks are arranged in the pattern of a
4-digit code: 4710.
Nonogram
A nonogram (also known as a picture cross) is a grid of squares with a list
of numbers along a horizontal and vertical axes. The object of the puzzle
is to fill in squares to reveal an image.
The numbers on the axes each dictate a group of squares that need to be
filled in. For example, if a row has the numbers “2 3 1”, then that row
has a group of 2 consecutive squares filled, followed by 1 or more empty
squares followed by 3 squares filled, followed by 1 or more empty squares
followed by 1 filled square. There could be empty squares on either end.
Here is an example of a nonogram puzzle.
The secret to solving a nonogram puzzle is to find places where squares
must be filled in. In the previous example with a 9x9 grid, two of the
columns has “6 2”. Because the two blocks plus the minimum separator of one
square takes up a total of 9 squares, there is only one way to fill in
those columns. You can also sometimes deduce squares in rows or columns
that are not totally full. For example, the topmost row has a “6”.
Regardless of where this block is placed in the row, the middle three rows
must be filled. Because there is also a “1”, two more squares to the left
must be filled. As deductions are made, mark squares that both must be and
cannot be filled.
The previous puzzle can only be filled as follows, revealing a lock code.
When you make a nonogram, it is best to go back and attempt to solve it. It
is possible to make a nonogram that does not have a unique solution. I find
it is a bit easier to make a solvable nonogram by filling out the
background and making the digits the negative space.
Decoder Devices
Puzzles using decoder have two elements. The first element is an encoded
message. This message cannot be decoded without the second element: a
decoder device.
A decoder device can depict simple cipher, which are simple to use.
However, the decoders in this section are less obvious to use. It will not
be immediately obvious how to apply the decoding or even realize that the
device is a decoder.
A template of a seven-segment display reveals numbers in an odd pattern.
Subsections of Decoder Devices
Body Parts
The cypher for this puzzle is simply an article of clothing with some numbers on
it. If the clothes are disposable (or you have washable ink that shows up), you
can write the numbers directly on the clothes. Or, you can do as I did in the
example below and simply safety pin paper numbers on the clothes so they can be
easily removed.
A one-piece outfit like a jumpsuit is nice to use so you can reference the whole
body on one outfit, but you could use multiple pieces. It is also nice to use
clothes that are a bit oversized for at least some of the players so they can
easily wear them. Wearing them is not necessary to solve the puzzle.
The second piece of this puzzle is a document that contains references to body
parts like the one here.
The following warm up stretch routine for is a great way to start the morning:
Pectoral Stretch (chest), Cobra Pose (abs), Triceps Stretch (arms, left then
right).
These two pieces are put together to get a code. The message references four
body parts in the following order: chest, abs, left arm, right arm. As you can
see from the image above, the jumpsuit has a number on each of these body parts:
chest has 4, abs have 1, the left arm has 7 and the right arm has 6. This leaves
you with the overall code 4176.
Grid Lookup
This puzzle starts with an image that has a grid on it. The image is often
a map or floor plan, but could really be anything. The important part is
that a letter (or number) is assigned to each horizontal and vertical
location of the grid.
The second part of this puzzle is a clue that suggests pairs of letters (or
numbers).
B-L
F-N
C-M
D-I
The puzzle is solved by recognizing that the pairs can be used in reference
to the rows and columns of the grid. In this example, the pair B-L
references the map row labeled B and the map column labeled L. The grid
block corresponding to this row and column has a 5 in it. Repeating with
the remaining pairs, we get grid cells with the numbers 4, 6, and 5,
respectively. This gives us an overall code of 5464.
The puzzle formed in this way is fairly straightforward. To make the puzzle
more challenging, make the pairs of letters less obvious. You can do this
by providing a list of two word phrases. The phrases alone do not make
sense. The trick is that the first letter of each word refers to a row or
location in the grid. For example, consider the list below.
Spy Tools
Bugged Lapel
False Narrative
Coded Message
Disappearing Ink
The first letters of each line are B-L, F-N, C-M, and D-I, which provide
the same lookup as before.
Invisible Ink
A simple way to hide a message is to write it in invisible ink. For a few
dollars you can get a pen that writes in ink that is hard to see but reacts
to ultraviolet (UV) light.
The other part you will need for this puzzle is a UV light, also known as a
black light.
The black light is given to the players, and the players have to shine it on
the correct object. Words written on objects will be invisible until
players reveal it with the black light.
Invisible ink pens are sold with different colors. I recommend using
“yellow” invisible ink pens. Other colors I tried were slightly visible
under normal light, which made them unusable for the puzzle.
You may have to experiment a bit on what you can write on. For example, I
find I cannot write on a printed image because the pen will smear the
printer’s ink just enough to see it. Different types of paper may work
better than others. That said, give the ink a little time to dry before
deciding it is too visible.
Paper Segment Display
The decoder device in this puzzle is a piece of paper with holes cut into
it that form some or all of the bars in a seven-segment display.
In my example here, I have cut only 6 of the 7 segments as the none of the
numbers in the code I am using need that segment.
The other part of this puzzle is the coded pattern.
Neither piece of the puzzle makes sense on its own. But when the template
is placed on top of the coded pattern in the correct positions, numbers are
revealed.
As can be seen in this example, the correct code is 3594.
When creating the coded pattern make sure there are enough cues for players
to know how to align the decoder template on the pattern. The decoder must
be placed precisely to reveal the correct number. In the example here, you
will see that there are boxes to show where to place the decoder and an
arrow to define which way is up on the paper.
The example here has one decoder number that has to be moved to multiple
locations to reveal all the numbers. An alternate approach could be to
create a template decoder that has holes for all the numbers together. This
would mean that placing the decoder in one spot reveals all numbers. A fun
change to this puzzle would be to have the holes in the decoder form one
set of numbers, but when applied to the code pattern, a different number is
revealed.
Mirror Images
These puzzles require players to use a mirror or some other related device
to create reflected versions of images. The reflections are used to reveal
a code.
A normal-looking code is reflected to reveal the real code.
Subsections of Mirror Images
Reflected Code
This puzzle starts with a printed series of digits that could potentially
be used with a combination lock.
This code, however, does not open any lock. The trick is that players have
to use a mirror to see the reflection of the digits. The reflected image
has the correct code.
When selecting numbers for the code, make sure that each digit makes sense
in both the original printing and in the mirror image. For example, the
reflection of 7 does not form a digit, so you cannot use that one.
Likewise, make sure the font used for the digits reflect well. For example,
the digits 2 and 5 can make nice reflections of each other, but many fonts
have enough asymmetry to make the reflection not resemble the digit well.
For the example above, I drew the digits myself to make sure they reflected
well. Drawing digits using a seven-segment display template works well.
When setting up this puzzle, consider mounting the code on a wall (with
instructions for players to not remove it from the wall). Because you are
using digits that reflect well, they will also look correct upside down.
Problems with orientation can be avoided if the code is mounted on a wall
in a fixed orientation. To make the puzzle more interesting, consider also
mounting the mirror on an opposite wall so players have to orient
themselves to get the code reflected in the mirror.
Hiding Places
Any escape room is going to involve the players finding clues and objects
that will help unlock the secrets. Some of these objects will not be in
obvious places. This section suggests some “fair” hiding places, some
“unfair” hiding places, and some puzzles to find objects that are not meant
to be found on their own.
Provide a map of the room to find a well hidden object.
Subsections of Hiding Places
Unfair Hiding Places
Discovering a clue in a fun, unexpected place can be very rewarding.
However, it is extremely frustrating to get stuck because you are missing
an important clue and cannot move forward. Before thinking about where to
place items, it is best to first consider where they should not be
hidden. Here we will consider the best practices when placing items in the
room.
These, of course, are only suggestions that I try to follow when placing
items. If you and your players like difficult Easter egg hunts and want to
make that part of the games, you can hide things in more difficult places.
But it is important that eventually players will be able to find all the
items and identify what is and is not part of the game.
Establish bounds
When making a DIY escape room in your home, not every object and space that
you use for day-to-day life will be part of the game. When setting up the
escape room, make it clear from the beginning what is part of the game and
what is not.
Likely, you will not be using every room in your home for your escape room.
Make sure it is clear to the players which rooms they will be using. This
can be done by making simple barriers such as closing doors or hanging
sheets. Alternately, you can simply tell the players which rooms will be in
bounds.
You probably don’t have empty rooms in your house just waiting to build an
escape room. (I don’t.) There might be shelves or cabinets that hold books,
knickknacks, crockery, etc. It is best to keep these separate from the
game, especially if they don’t match the theme of the game. Once again, you
can cover up these items with a sheet or just let players know to ignore
those items.
Don’t encourage players to tear apart the room
One of the reasons to make clear where objects might be is to discourage
players from ransacking the room. You don’t need the hassle of players
pulling cushions off of a couch, removing sheets off of a bed, upturning
chairs, or otherwise moving furniture around. In addition to being a pain
to clean up afterwards, such actions could interfere with the game itself.
Thus, avoid hiding objects in places that are not in open spaces or obvious
containers (like drawers, cabinets, or boxes). Don’t shove objects under a
couch or in its cushions. Don’t hide things in sheets or under a mattress.
If a clue could be hidden in any nook or cranny, players will need to pull
the place apart to find them.
Players should be able to easily reach objects
You don’t want players climbing over furniture to reach things. That will
just encourage players to move furniture around, which you don’t want, or
hurt themselves climbing over furniture, which you also don’t want. Thus,
don’t place anything on top of furniture or shelves that are out of reach
of players. That way you can inform players at the start that they won’t
need to climb to reach anything and remind them if they attempt it.
Likewise, it’s not great to have players crawling underneath tables,
chairs, or beds (unless that is specifically part of the puzzle). I usually
avoid hiding things underneath furniture.
Make it clear which objects are part of the game
As players inspect objects in the game, it should be clear which ones are
part of the game and will be used to solve puzzles. Granted, not every
object will be part of a puzzle. There will likely be props or other items
that serve no specific purpose. But there should be a limited amount of
items players need to deal with. It’s not fair to make players go through a
hundred books or other objects on shelves with no clues about which ones
are important.
Breaking the rules as part of a puzzle
As stated at the beginning, the suggestions here are not unbreakable rules. It
is up to you to choose how difficult finding objects needs to be. That said,
these suggestions can also be broken if there is another clue, such as a message
or map, to lead players to find the object. In
that case, the challenge is not finding the object but solving the puzzle that
leads to the object. You can place an object out of reach if there is a
tool to reach it. I have also suggested avoiding having
players crawl over or under objects. But, of course, this does not apply if you
want to add physical tasks, perhaps as part of the theme, that players need to
complete.
Underneath
A simple hiding place is a message underneath another object. The object
can be a simple prop such as a plate or cup. For example, your escape room
might have this normal place setting.
The players are expected to search around for clues. Simply lifting up the
objects reveals a hidden clue.
This is a simple puzzle that encourages players to interact with the
objects in the room. Players usually find the clue simply by picking up and
examining objects. The clue gets revealed secondhand as players move things
around.
The hiding place works best when hidden underneath a prop that is not
otherwise needed. The prop should be easy to move and is easy to handle.
Underside
Place a clue on the bottom side of an object. This puzzle works similarly
to placing a clue underneath an object except that the clue is stuck to
the underside.
The fun part about this puzzle is that sometimes players will pick up an
object to look underneath it, but miss the note that is stuck to the
underside.
In the example from the previous puzzle, the players might check underneath
the plates in a place setting, but find nothing.
The players may check several times before looking at the bottom of the
plate where the real clue is.
Tea Light Message
In this puzzle, the players are presented with what appears to be an
ordinary tea light candle.
The candle is lit for the players, and for a while it is just a normal
candle like any other prop. But if the players happen to look back at the
candle later, they might notice something forming in the wax.
Later, the candle’s wax becomes completely clear, and the message is
clearly visible.
This challenge does not require the players to solve anything. Rather this
is a hidden item that is difficult to find even though it is clearly placed
among the game items. It is difficult because when the players first start
the game, the message cannot be seen and, after an initial glance, the
players may not take a close enough look again. Plus, it is just a fun
effect.
This puzzle is created by deconstructing a tea light candle and placing a
paper with the message drawn on it underneath the wax. Start with a fresh
tea light (with uncolored wax) and pop the wax out of its metal bowl.
Next, cut out a piece of paper in a circle that can fit at the bottom of
the metal bowl. Plain white copy paper works well. (The paper will not burn
as long as you don’t let the candle burn all the way out, and you will have
plenty of time before that.) You can use wax to trace out the shape.
After tracing the circle, cut out the paper and write the message on the
paper. Place the paper against the wax with the message pressed against the
wax and then place the wax, wick, and message back in the metal bowl with
the message on the bottom.
The tea light candle is now ready to be lit.
Note that in the pictures above, I’ve taken out the wick, fed the wick
through a hole in the paper, and placed the paper between the wax and the
base of the wick. In the tea lights I was using, the wick was not attached
to the wax (before it was lit). In other tea lights, the wax is already
melted to the wick. If this is the case, you probably won’t be able to
remove the wick without breaking it. In this case, you can probably just
put the paper under both wax and wick. Just make sure none of the message
is underneath the wick base.
I recommend testing this before using it in your escape room. The main
thing to get right is making sure the timing works well. When I first built
mine, I found that it took between 1 hr and 1 1/2 hr to fully see the
writing on the paper. This is too long as your escape room will probably
finish in this time.
I worked around this problem by lighting the candle before the escape room
and waiting the 1 - 1 1/2 hr to see the message and then blow the candle
out. When the candle cools down, the wax will become opaque again and the
message will be obscured. When I lit it again for the escape room, it now
only took about 30 minutes to become clear. You might be able to quicken
the time by removing some of the wax instead, but it will likely be hard to
do precisely.
At any rate, there will be a long delay between when the candle is lit and
when the message is visible. As such, it is probably not fair to make the
players light the candles as part of the puzzle. First, players have no way
of knowing if their actions are helping solve the puzzle. Second, a puzzle
that requires players to wait around for 30 minutes will not be very fun.
Instead, light the candle as players enter the room. It works best to make
this part of the escape room scenario (for example like the ghost chasers
escape room).
Maps
In this puzzle, an important object is hidden somewhere players are not
expected find. To find the object, players first need to get a map that
will lead them to the correct place.
The map is of the escape room that the players are in. The map does not
have to be detailed, but it should have enough landmarks for players to
orient the map and find the location it is pointing to. Here is a simple
map I once used to lead players to find a key hidden in the window drapes.
Mazes
It is probably impractical to construct a maze that players can physically
enter. Instead, players are provided a printed maze that must be navigated
to find a code to progress. Some mazes are more subtle than others.
Maze puzzles can be used to simulate the traveling. This might mean
navigating a complex space (such as a series of air vents) or traveling
long distances (such as flying across the globe).
Let players be globetrotters as they follow a path on a map.
Subsections of Mazes
Follow Path
In this simple puzzle, players are given a drawn maze with a clear start
and finish. Embedded within the maze are numbers or letters.
To solve this puzzle, players must follow the path from start to finish.
Standard maze rules apply: no crossing lines, no back tracking. The maze
should have a single, well defined path. One path leads from start to
finish with all other turns leading to dead ends. This path from start to
finish will pass through a sequence of numbers/letters.
The sequence of numbers/letters forms the code. In this example, the code
is ENTER.
You can construct the maze yourself, but there exist many free maze
generators online that will easily construct one for you.
Maze Directions
This puzzle involves a simple maze. The maze should be relatively small and
only have right-angled turns. Here is an example.
The path from start to finish involves moving in straight lines to the
left, right, up, or down directions.
The directions used to solve this maze are used in combination with a
directional lock. The lock is moved in the same directions as the path
used to solve the maze.
So, in this example, the correct path goes right, up, left, up, left, down,
right. The directional lock is moved in these directions to open it.
Although the maze could specify the start and finish directly as in the
example above, the puzzle can be worked into a room by adding multiple
labels of different locations. Here is an example of using the previous
maze as an interconnection of rooms.
In this case, there needs to be a hint to direct players from the “office
space” to “manufacturing.” The directions they take for that are entered
into the directional lock.
Map Trace
This puzzle first involves a map. The map can be mounted on the wall or
made available in a box. The map can be of real or imaginary places. It can
be global or for a local area. It does not matter but the location and
scale should match the theme of the escape room.
For the example below, I am using a digital world map provided by the UN.
This map likely has more detail than is easily printed for use by players.
For a world map, consider using a commercially printed map. You might
already have a large-format world map in your house. Or perhaps you have a
globe. Or you might even have a board game with a convenient map printed on
its board such as Risk or Pandemic.
The second clue of this puzzle involves a collection of locations on this
map. The players might find multiple airline tickets with the following
departures and destinations. (They are shown in a table here for brevity,
but it will be more interesting to provide each of these transfers on their
own card.)
Depart
Arrive
DR of the Congo
Egypt
Egypt
India
India
Mongolia
Mongolia
Ukraine
Peru
DR of the Congo
United States
Peru
An optional third component of this puzzle is a hint for the proper order
of the locations. In this example, the connections of the departures to
arrivals trace out a path. Another clue could be to assign a date to each
location or order by some property of the locations (such as population).
If players are expected to reorder them, it is best to provide each
location on a separate card to make sorting easier. For a simpler puzzle,
simply provide the list of locations in the proper order.
Given the clue above, the order in which the locations were visited are as
follows.
Location
United States
Peru
DR of the Congo
Egypt
India
Mongolia
Ukraine
Once the players have determined the proper order of locations, they have
to trace out the path on the provided map.
A key feature of this path is that each segment goes primarily in a
cardinal direction: north, south, east, or west. In this example, the path
goes south, east, north, east, north, west.
This sequence of directions is finally used to open a directional lock
with the directions corresponding to the directions on the map. In this
case, the lock opens up with the code down, right, up, right, up, left.
Misdirection
Experienced players are constantly looking at items and cues with a
critical eye. Everything has a double meaning. Everything is used in a
weird way. It’s always impressive to watch players unravel tough puzzles.
However, this mindset often leads to overthinking. Some fun puzzles will
exploit this to misdirect players to miss the obvious answer.
The online form is impossible. Follow a link to the real data.
Subsections of Misdirection
Literal Code
One of the most fun ways to hide a secret message is to literally write out
the message, but place it in a context that suggests a different meaning to
the word. Take, for example, this note that players might find.
Brett, the access code to engineering is wrong. You need to change it.
At first glance, this appears to be a useless piece of information. It just
says that an access code is wrong, but it doesn’t say what the wrong or
right code is.
On second glance, well, it still doesn’t help.
The trick to this puzzle is to realize that the words can be interpreted in
another way. The message literally tells you that the access code is wrong.
The word “wrong” is used to open a combination lock or some other access
code. This leap in interpretation is difficult to make but seems so obvious
in retrospect.
This hidden in plain sight code can be formulated in many ways. The main
point is that the code word serves another function in the sentence it is
in. There should also be at least one other distracting sentence. Here is
another example.
Peter Piper picked a peck of pickled peppers. To pick the password remove
the P’s from that.
Watch the players flail as they try to make sense of the first sentence
without the letter P. Then hear them groan when they figure out the
password is simply “that”. (“that” with all P’s removed is “that”.)
Red Herring
Red herring is an English idiom that refers to a clue that is misleading
or distracting. The phrase is often used within the context of a mystery
story where the detective collects many clues, some of which turn out to be
irrelevant. Red herrings help prevent the solution of a mystery from being
obvious before the reveal.
Red herrings are much less important in an escape room than in a mystery
story. Most escape rooms do not have red herrings, and you should not feel
obligated to add them. However, I enjoy throwing in a red herring or two to
throw players off guard.
I typically make the red herrings simple clues and puzzles. As an example,
a clue might be a typed letter with the following return address at top.
CCD Laboratories 1600 Red Herring Ct. Atlanta, GA 30329
My family has done enough escape rooms to pay attention to numbers placed
within written material. So, I expect them to try these numbers in locks
around the room. But they won’t work (snicker).
All that said, you don’t want players to get too wrapped around trying to
make red herrings work. To this end, it is best to provide a cue that
something is a red herring. I’ve established with my family that when I use
the phrase “red herring,” it signals that it will not help investigating
further. In the previous example, note that the street name is “Red
Herring.” In another example, in one room I had a decoy QR code
(distracting from the real QR code players needed to construct).
The page has a hidden message text at the bottom:
spiRits might dEceive and play harD tricks to entertain
tHemsElves, but for thReats, youR best frIeNd is a
Ghost.
The message uses both capital letters and highlight letters, making it
easy to see and decode. The message is “red herring,” which is a signal for
players to stop looking.
Of course, you could use a different signal for a red herring. You could
instead say “just kidding,” place a 😜, or Rickroll the players. Whatever
you choose, place it on red herring but never on legitimate clues.
Pointless Form
Online forms are a convenient mechanism to incorporate into puzzles.
Enter the correct code to get the information needed for the next box or
room. As soon as players see a form, they will inevitably look for clues
for the right answers to get past the form.
But here is the trick of the puzzle. There is no answer to the form.
Instead, players must see a link in a subtle part of the page to take them
to the “right” page.
Here is a straightforward example of a (fake) online login form. The
username is filled out and the players “obviously” need to find the correct
password.
Players may try to guess the password or infer it from clues, but none will
work. The page will just say that the password is invalid.
In fact, the users are never expected to find a password. The trick is to
notice there is a link at the bottom of the form to reset the password. The
players just need to find and click this link to get to the solvable form.
This example was created with online Google tools. The form itself is a
simple Google form with a validation that fails for most anything.
Unfortunately, you cannot place the “reset password” link directly in a
Google form. Instead, I had to use a Google site in which I embedded the
form and added the link below.
Construction
These puzzles start with many items. They can be put together to construct
an item. This construction reveals a code.
The missing pieces in a jigsaw puzzle reveal a code.
Subsections of Construction
Jigsaw Holes
In this puzzle, players are given pieces of a jigsaw puzzle to complete.
The jigsaw is missing pieces, and the holes of the missing pieces form
numbers.
This puzzle uses a standard jigsaw puzzle set. A 300-piece puzzle is a good
size to make it work. Constructing a jigsaw puzzle this size takes too long
for the pace of an escape room, so a mostly completed puzzle should be
provided.
Throughout the game, players are given puzzle pieces that can be assembled
in the jigsaw. When all the pieces are correctly placed, a code is
revealed.
For a fun addition to the puzzle, split the pieces into two sets. The first
set reveals one set of numbers, which are a red herring. The second set of
pieces fills more of the holes to reveal different numbers. For example,
the numbers above could be further filled in with a different set of
numbers.
This puzzle is more time consuming than difficult. It is a good puzzle to
have to occupy players that may be uncomfortable with solving more unique
puzzles. It is also a puzzle that all players can work together on.
That said, it will take time for players to find the placement for the
jigsaw puzzle pieces they are given. As such, I recommend providing the
initial partially assembled in the first room and provide at least the
first set of pieces well before the code is needed.
Most assembled jigsaw puzzles arrange the pieces roughly in a grid. This
will make it straightforward to construct digits as holes in the jigsaw.
Any digit can be constructed in a 3x5 area of puzzle.
If possible, pick a distinct color for each region of each digit (something
that is not done well in the example above). This will help players
construct the jigsaw faster, which is good as construction of the jigsaw
puzzle takes much longer than a typical escape room puzzle.
Unlikely Tools
Sometimes, all you need to solve a puzzle is the right tool. In these
puzzles, players are given a tool, but it might not be obvious what it is
or how to use it.
This puzzle starts with a simple to construct tool: a magnet tied to the
end of a string.
The weight of the magnet allows it to be easily lowered into spaces.
The second part of the puzzle involves a container with a small opening.
Inside the container is a key or some other small metal object that is
needed to continue in the room. In the following example, I am using a vase
with a narrow opening that prevents players from reaching the contained key
with their hand.
To retrieve the key, the players must lower the magnet into the container,
get it to stick to the key, and lift the magnet back up with the string.
Overall, this is an easy puzzle but still satisfying, making it good for
players of any age or skill level.
When setting up this puzzle, make it clear that players should not pick up
the container or attempt to pour out the key. What I did in the example
above is to put water in the vase with the key and leave a note that makes
it clear that players should not touch or spill the liquid.
Be careful. This is a highly corrosive acid. In retrospect, maybe I should
not have left such a dangerous substance laying around the lab.
DO NOT TOUCH! DO NOT SPILL!
Orders and Arrangement
A short message can be broken into pieces and divided among a group of
similar objects. The objects are then arranged in the correct order to
reveal the correct message.
This puzzle arranges the letters of a message in a grid. The words read,
naturally enough,1 from left to right. However, the grid is
written on sticks or other skinny objects oriented vertically so the
message can only be read when the items reform the grid.
The puzzle starts with the players finding a collection of sticks with
letters on them. They may all be provided together or, for an added
challenge, distributed among multiple boxes to keep the players guessing
when they have them all. Unarranged, the sticks look like a hodgepodge of
letters.
In the easiest form of this puzzle, at the top of each stick is a
highlighted letter that is used as a key to arrange the sticks in the
appropriate order. The word can be anything recognizable, but it is helpful
to have it related to the objects being used or the location they are
found.
With the sticks in the correct order, the letters can be read tor form
words: LOOK UNDER CHAIRS.
For a bit of an extra challenge, you can leave out the key word at the top.
Players should still be able to arrange the sticks to form the actual
words.
To make this puzzle really challenging, have the sticks arranged
unevenly. Provide a clue that suggests a sequence of letters (each uniquely
listed). The players have to find not only the order but also the vertical
positions. In this example, a separate clue gives a sequence of elements
(Vanadium, Indium, Carbon, Iodine, and Cobalt). With the help of a periodic
table, these element symbols (V, In, C, I, Co) are found on these sticks
and lined.
Now in the proper orientation, the letters of these elemental symbols form
a message.
This is of course assuming you are writting the message in
English or another language that reads from left to right. If writing
in a language that goes right to left or top to bottom, adjust
accordingly. ↩︎
Group and Count
This puzzle uses a collection of items that are clearly similar but have an
attribute that is clearly different. In the example below, a gaming table setup
provides expected items like cards and chips.
All of the chips come from the same set and are easily recognized as related.
However, it is also obvious that the chips come in different colors. The first
step of the puzzle is to collect the chips by color.
We can now count the chips of each color. There are 6 red chips, 5 green chips,
and 9 blue chips. These numbers form digits of a code. The only remaining task
is to determine the order of the digits. This is done by providing a sequence of
colors. If you happen to have a lock with different colored dials, you could
match the chip color with the dial color.
If you don’t happen to have such a lock, you can easily create a sequence of
colors by drawing with markers/crayons or, like here, just some dot stickers I
picked up.
You may notice that in the example above is a dot sequence
blue-red-yellow-green, but there are no yellow chips. That is partially because
I had yellow stickers but no yellow chips. But this adds an interesting
challenge to the puzzle. There are zero yellow chips, so that digit is 0. This
makes the code 9605.
Other collections of items with different properties could similarly be used.
For example, you could have a collection of coins of different denominations.
You could have playing cards from different suits. You could get a book of
stickers with 4 or so different patterns.
Water Rings
The water rings puzzle makes use of common objects, scraps of paper and drinking
glasses, to work backward to find an original arrangement. This is a good puzzle
to match theming in spaces involving entertaining, drinking, or cleaning up.
The setup for this puzzle starts with scraps of crumpled paper strewn around the
room.
When players unfurl these scraps, they will find that they are torn pieces of
paper. On each there will also be a circular mark.
The next step of the puzzle is to notice that the paper scraps are ripped from
the same sheet of paper. By matching rips together, the players reconstruct the
original sheet.
To complete the puzzle, players surmise that these circular marks were created
from water rings left by glasses that were placed on them. The players find the
glass with a base that matches each mark.
Each glass has a number on it, and the arrangement gives the code.
Note: When creating this puzzle, make sure to select glasses with very
different bases (probably more distinct than that shown here). Consider using
a shot glass, pub glass, oversized mug, and/or glasses with a non-circular
base. This puzzle can be altered to use silhouettes from other types of
objects.
Creating this puzzle is straightforward. Start with a collection of glasses with
distinct bases (or throw in other objects if necessary). Get a large enough
sheet of paper and make some marks that trace the bottom of these
glasses/objects.
There are numerous ways you can make these marks. One way is to trace around the
glass bases with a pen or pencil and then fill in to make it more noticeable and
stylish. However, the way I did these is slather some acrylic paint on the glass
bases and stamp them on the paper. The paint can be easily rinsed off the glass
as long as it is done before the paint dries.
After that, rip the paper to have each mark on its own piece. Make sure each of
the rips are unique so that players can match them up. Then, crumple up the
pieces and scatter them around the room when you set it up.
Card Edge Message
The setup for this puzzle is a deck of cards spread out decoratively.
The cards look ordinary. The order may be conspicuous but has no special
meaning. The players can pick up one of the cards and see nothing special about
it.
The solution is simply to move the cards back into a stack. Once they do that,
the players simply have to observe that there is a message or code written on
the side of the stack.
This message is only visible when the cards are stacked in the correct order.
The cards should be spread in the order they need to be in so players just need
to scoop them up in a pile in the correct order. That said, you should make note
of the correct order to help players arrange them back in case they happen to
shuffle the cards before noticing the message on the side.
Groovy Blocks
This puzzle starts with a collection of blocks. The blocks have some
grooves cut into opposing ends.
Players will probably quickly realize that although there are several
different patterns, some of the patterns line up. Players will probably try
to line up the blocks to make the grooves continuous, but this will not
work for more than a pair of blocks.
The trick to this puzzle is that the blocks need to be stacked vertically
rather than arranged horizontally. When stacked, the groove patterns can be
matched up. More importantly, the holes formed by the grooves form a
pattern of numbers.
Looking at the side of the blocks, the code is 8347.
This code was chosen because it results in a different groove pattern
between each pair of blocks, and none of the patterns are palindromes. This
means that there is only one way to arrange the blocks where all the
patterns match. Also, viewing the numbers upside down or inverted does not
show all proper numbers, so there is only one way to interpret the numbers
from the side.
Solving the groovy blocks puzzle can be tricky and might take the players
some time. I recommend providing the groovy blocks well before their code
is used so that the players have other puzzles to work on while they figure
this out.
The groovy blocks in the examples above were created with a 3D printer.
If you have a 3D printer, you can use this STL file.
If you don’t have a 3D printer, there are other ways to make matching
grooves. One way is to use a table saw if you have one. Cut up a 2x4 into
equal blocks of an appropriate length. Then set the blade low so that the
wood can be passed over the blade to cut a groove but not all the way
through the wood. Set the fence to guide a block to cut the groove the
appropriate distance from the end of a block. Keep the fence in place to
cut each groove that matches opposing blocks.
You can use this pattern to guide the placement of the fence and where to
cut the blocks.
If you don’t have a way to make precise grooves in blocks, an alternate
approach would be to draw lines instead of grooves. Use a square tool and a
pen to draw lines perpendicular to the edge of the block. Hold two blocks
together to make sure that the lines match up. Make sure the lines spill
over the edges so that the locations, and hence numbers, can be seen when
the blocks are stacked correctly.
Cup Cryptex
A cryptex is a device that contains a sequence of cylinders with letters
on them. The cylinders are rotated to form words and unlock the device.
Don’t happen to have a cryptex lying around your house? No problem.
You can easily fabricate one with a few Styrofoam cups. The point of using
Styrofoam cups is to use some that have thick lips so that when they are
stacked, a region of the cup is still visible.
The cup cryptex is created by writing letters around the lips of the cups.
The letters should be spaced evenly around the lip. When the cups are
stacked (in the correct order), the cups can be rotated to form words.
A typical cryptex device will unlock and open with the correct code. A cup
cryptex will obviously not do that. Instead, the players will arrange the
letters to form a key word presented to them, and elsewhere that
arrangement will show the code word(s) they need.
A cryptex often has 26 letters on each cylinder. Your cup cryptex does not
need that. Instead, you will probably have 4 to 6 letters per
cup/cylinder. When arranged correctly, each row will form a word.
You may or may not provide the order in which the cups should be stacked.
If the order is not provided, make sure that there is enough context to
reasonably figure out the order based on the words formed.
Qr Construction
In a home DIY escape room, you can leverage the internet by directing
players to content on their mobile devices using QR codes. As a reminder,
a QR code when scanned with a mobile device’s camera can direct bring up a
particular URL. There are plenty of free services to create a QR code from
any URL you choose,
A QR code can be posted on just about any object, and sometimes QR codes
can be parts of items in the room. But alternately, you can make the
building of QR codes part of the puzzles.
The basic idea of these puzzles is to provide parts of a QR code that have
to be put together in some way. Essentially, these puzzles break apart or
otherwise mangle a QR code, and the players have to put it back together.
Before we talk about how to mangle QR codes, it is helpful to be familiar
with what changes will not break a QR code and which will. This is
important as the design of a QR code construction puzzle involves breaking
the QR code and having the player fix it.
Changes you can make to QR codes
QR codes are designed to be quite resilient to change. Because they are
designed to be scanned from a camera, they are readable in
the face of noise and misalignment. Thus, it is possible to rotate the QR
code or even flip it upside-down and it will still work.
Not surprisingly, the QR code can be sheared in the same way that might
happen if the camera is not held perfectly straight.
Surprisingly, QR codes can be mirrored and will still work.
There is redundancy in a QR code’s data, and they still can be read when
certain parts are covered up. In particular, the center part of the QR code
is redundant, and it is common to place a logo there.
'
It is also possible to blend a QR code with another image as long as there
is enough contrast between the 2 colors of the QR code. This can be
particularly helpful for QR construction puzzles as it gives hints to users
on the proper orientation of the image pieces.
Changes that break QR codes
As resilient as QR codes are, once you break off a big enough piece, it
will no longer be readable. When making a QR construction puzzle, you want
to force the players to put together all of the pieces before it can be
scanned.
When you look at a QR code, you will see “eyes” in three of the corners as
well as a smaller alignment eye in the fourth corner. QR scanners use these
elements to register the position of the code, and removing any of them
will make the code unreadable.
An interesting vulnerability of QR codes is that the matrix of squares has
to be precise. In the following example, the left image splits the two
halves of the code by a small amount. The right image shifts the two halves
a little bit vertically. Despite the changes being very small, they render
the codes inoperable. This means once you separate the QR into pieces, it
needs to be possible to align them again precisely.
Puzzles
With that in mind, here are some puzzles based on putting together QR code
pieces.
A sheet of paper must be folded backwards to line up a QR code.
Subsections of Qr Construction
Jigsaw QR
Print a QR code, and then cut the code into pieces.
To solve the puzzle, the players have to place the pieces to form a square
and the correct QR code to scan and get the next clue.
The shape of the pieces does not matter a lot. However, it is better if
they are constructed such that there is only one way to form them back into
a square. They should also each contain a critical part of the QR code so
that the code cannot be scanned without all of the pieces. Lots of shapes
can satisfy these conditions, but here is a pattern that works
well.1
The players will have to place the pieces precisely to read the code
properly. To facilitate this, print a reasonably large code (about
4in/10cm). It also helps to print on a heavy weight paper.
Most people think of jigsaws as having interlocking
pieces, which these suggested pieces clearly are not. So, perhaps this
is technically more of a tiling puzzle, but making the pieces
interlocking is probably overkill. ↩︎
QR Fold In
This puzzle presents the players with a piece of paper with pieces of QR
code printed on it. The codes cannot be properly scanned on the flat paper.
The trick is to fold the paper to bring the pieces of QR code together. I
suggest using a simple fold reminiscent of Mad Fold-Ins (also known as
an origami pleat fold).
Creating a fold-in image is not difficult. Simply cut the image in half and
separate the two pieces by some distance perpendicular to the cut.
The folds have to be pretty precise to be properly scanned. To help, you
can provide a little overlap in the QR pieces and guiding lines on where to
fold and align the two pieces.
Figuring out and doing one fold is pretty easy. If you want to add an extra
challenge, you can make a second fold in a different direction. This can be
done by cutting the image for a fold in one direction, and then treating
the entire result as an image and cut in a different direction. (Note that
the players will have to fold in the opposite order you cut the images to
create it.)
Here is an example that requires a horizontal fold and then a little more
tricky diagonal fold.
QR Cube
Turn a 3D rotating cube puzzle, like a Rubik’s Cube, into a key for your
escape room by gluing a QR code to one of its faces. Mix up the puzzle, and
then have the players unscramble the QR code to proceed.
To be clear, solving Rubik’s Cube puzzles is tricky, and it is unreasonable
to expect players to solve the entire puzzle. But solving one face of the
cube is much easier, and someone not familiar with the puzzle should be
able to put together a QR code on one side.
This puzzle is easy to make, but there are a few things to keep in mind.
First, although the most common form of puzzle is made of 3x3x3 bricks,
consider getting a 2x2x2 puzzle like the one pictured above. This will be a
bit less time consuming for players, particularly those not experienced
with Rubik’s Cube. More importantly, the 3x3x3 puzzle has a square in the
middle of each space that can be arbitrarily rotated in the solved face.
Rotating the middle section might break the QR code, and it is hard to
understand the correct orientation in a QR code.
Second, speaking of the orientation, it is possible to get all the correct
colors on the same face but in the wrong position. If this happens with the
QR code, the orientation will be wrong and it will not scan. Although not
pictured here, consider superimposing a second, more recognizable image on
the QR code, like demonstrated below, to help players orient the squares
correctly.
Third, remember that the alignment of the QR code pieces have to be fairly
precise to scan correctly. To help this, print the QR code to a heavy
weight paper to help it hold its shape as the puzzle is spun. Also, to make
sure the orientation is correct, glue the code on first and then cut it in
place. Put a dab of rubber cement on each square of the face and press the
QR code to the cube. Then take a sharp knife and cut the paper along the
seams of the cube.
Fold Back QR
This QR construction involves a single piece of paper. It has half of a QR
code on each side and (optionally) a QR code in the middle.
The middle (full) QR is a decoy. If players scan it, it just leads to a
red herring.
The real clue is the other QR code, which is divided in half and placed at
opposite ends of the paper. The left half of the QR code is on the right
side of the paper and the right side of the QR is on the left side of the
image.
To solve the puzzle, players must fold the page backward to bring the two
ends together on the opposite side.
On the other side, players must line up the edges of the QR code.
To make the QR alignment possible, the ends of the paper need to be trimmed
right to the QR code. Also note that to make the code work players need to
be precise about the alignment. Thus, make sure there are enough cues (like
the bounding box shown here) to get the alignment correct.
Simple Machines
With some pulleys, levers, or other simple machines, you can make your
escape a live space that responds to the players actions.
Commercial escape rooms often have moving parts to respond to the players'
puzzle solving and progression in the game. These are often driven by
electronics and motors. Such machines are likely beyond the cost and time
for a one-time escape game in your house.
Our goal with these “puzzles” is to replicate the experience of actions
happening in response to actions using cheap and simple means. Some of
these machines are in response to solving a puzzle. Others can form part of
a puzzle.
The main antagonist is revealed and then defeated.
Subsections of Simple Machines
Hook Pulley
To make a simple gravity-driven device, screw a hook into the ceiling and
feed string through it.
The string on one side of the hook will be attached to an object that will
be hanging off the hook. This object will either be out of reach or will be
covering something important.
Extend one end of the string toward a fixed object in the room that it can
be tied to. But don’t tie it directly to that object. Connect the string to
the shackle of a padlock with a second string attached to the fixed object.
To solve the puzzle, the players must unlock the padlock and remove it from
the strings. When they do, the hanging object will fall to the ground and
reveal the next clue.
A doorknob on a closed door makes a good fixed object to tie the lock-end
part of the string. Of course, the door needs to stay closed until all
hook-pulley locks are removed. If opening this door is part of the escape
room, you should make solving the puzzle to open the door dependent on
clues revealed from these locks attached to it.
The hanging object that falls should be heavy enough to pull the string
through any hooks. If the hanging object is very light, the friction of the
string will keep it suspended. That said, don’t hang something too heavy.
You could run the risk of pulling the hook off the ceiling, damaging
something it falls on, or hurting a player. Also, to prevent hurting
anyone, hang the object somewhere players are unlikely to be standing such
as against a wall or over a table. To get the hanging object in the right
place, you will often need two hooks, one where the object hangs and one by
where the padlock is anchored, and the string is extended between these two
hooks.
The falling object should provide the next clue to advance the game. You
can be creative with the object that falls; make the action part of the
plot of the room. For example, if the plot of your room includes a
helicopter crash, hang a model helicopter with a clue inside. When the
puzzle is solved, the helicopter dramatically falls. (You can make it out
of something like Lego to have it dramatically break as well.)
When using strings, it’s good to remind players that unknotting the string
is against the rules. That ruins the fun of solving the puzzle. Also, when
hanging things from the ceiling, let players know not to attempt to pull
items hanging from the ceiling. In addition to circumventing the puzzle, it
can yank the hooks out of the ceiling.
Hanging Boss
An engaging story for an escape room will have the players working together
to overcome an imperative adversity. This might involve defeating a
particular person or beast. This hanging boss provides a method to reveal
and then defeat the “boss.”
Game Play
The hanging boss starts mounted on the ceiling. It should be unrecognizable
and out of reach. If players try to interact with it directly, remind them
not to pull things off the ceiling.
The hanging boss actually serves the function of two boxes, each with its
own puzzle and each revealed with a lock on a hook pulley. The first lock
drops the tail end of the boss. The boss will become unfurled and hang from
a second string from the ceiling. The boss can be a figurine (such as a
Halloween decoration), a cardboard cutout, or some other physical
representation.
When the boss is revealed, a clue is also presented. It could be an item
dropped when the tail of the boss is lowered, or it could be written on the
boss so that it is only visible once the boss is revealed.
The second and final lock on a second hook pulley drops the entire boss
to the floor, signifying its defeat. Now that the boss is on the floor, the
players can access a clue mounted to the top.
Setup
The setup of the hanging boss is done in the reverse order that it is
solved. Its head is first hung in place, and then the bottom is pulled up
to the ceiling.
The first step is to mount the contents of the second “box” on the boss’s
head. An easy way to do this is to punch a hole in an envelope and place
the clue(s) inside of the envelope. Feed a string through the hole in the
envelope and tie it to the boss’s head.
From here, loop the string around a hook pulley in the ceiling and
suspend the boss by connecting the other end of the string to a fixed
object in the room through a padlock. (See the hook pulley puzzle for
more details on setting up the figure so that it can be dropped once the
padlock is opened.)
Once the boss is hanging in place, tie a second string to the bottom of it.
If the boss is made of fabric, it can help to attach a safety pin to the
fabric and tie the string to the pin. Then, feed the string through a hook
pulley, pull the entire boss up to the ceiling. Mount it to a fixed object
through a second padlock. Make sure the strings for the head and tail do
not get tangled with each other. Once the boss is in place, place any items
for the first “box” on top or rolled inside. They should stay in place
until the tail is dropped, at which time the items should fall to the
floor.
Miscellany
Here is a collection of more puzzles that do not fit cleanly into any of
the other categories.
Players must “sketch” a pattern on a directional lock.
Subsections of Miscellany
Sketch Directions
In this puzzle, players are given a simple object to sketch. A drawing is
given with a particular direction to draw each line or curve of the sketch.
For example, you could provide the following figure to demonstrate how to
write out the word “HELLO” (perhaps for children just learning how to
write).
To solve this puzzle, players must mimic the drawing directions in a
directional lock. For example, to “draw” the H, the players enter
down-down-right into the directional lock. Two “write” the entirety of this
word, players enter
down-down-right-down-right-right-right-down-right-down-right-left.
Another way to set up this puzzle is to have a template showing the
directions for all letters, and then instruct players to “write” out a
word. This level of indirection will make the puzzle harder.
The previous example used letters, but this puzzle could work with any
symbol. For example, here is a symbol with directions associated with it.
This example would require the directions right-down-left-right. To make
the puzzle a little more challenging, you can provide multiple symbols and
provide hints on which one to use.
When creating these diagrams, make sure that directions are given for each
curve. Also make sure that the directions are clearly left, right, up, or
down. Do not use diagonal if that is not supported by the physical lock.
You will see in these examples that diagonal lines still have an arrow in a
horizontal or vertical direction.
Escape Rooms
Here are some suggested escape room games that you can set up. Each one of
these escape rooms has a basic plot that drives the game along. The
anatomy of these escape rooms is described by a collection of rooms and
boxes. With each room and box is a suggestion for a puzzle to open it.
Although you are welcome to adhere directly to the suggested rooms, feel
free to make changes. Change the ideas at will to fit your physical space,
to fit the puzzles you are most interested in constructing, or to match the
skills and enjoyment of the players.
A group of paranormal investigators must chase down ghosts, free souls, and battle evil.
Subsections of Escape Rooms
Virus
Synopsis
Virus is an escape room that follows the players as they battle a new
pandemic. This is a good place to start if you are creating your first
escape room. It is a fairly small escape room in terms of the number of
puzzles and spaces. The suggested puzzles are fairly easy to set up, and
there is a lot of flexibility in replacing puzzles if you so desire.
The game is divided into two spaces. They are themed first as an office
space and a laboratory. The flow diagram is drawn at the end of this
page as well as the setup. This setup also has a list of materials
you can use to help you build the puzzles.
Scenario
The players are researchers at a microbiology and infectious diseases
laboratory. The lead researcher of the lab, Dr. Sarah Beaker, has been away
in the field researching a recent outbreak of NEONORO, a deadly and highly
infectious virus, while you work at the home base to understand the nature
of the disease.
Today at work, the players are presented with a package sent from Dr.
Beaker. It contains a note (among other clues) in which she is requesting
help from the players.
As you know, I have been traveling the world researching NEONORO and
helping where I can. Thank you for taking care of the laboratory in my
absence, but things have gone sideways and now I need your direct help.
First, we need to reestablish communication. General Halftrack, who
originally sponsored this excursion, has suddenly tried to block my
investigations. He has severed my connection to our mail server. We do not
have time to mail letters back and forth.
I cannot fix my connection from here. You must do it from the lab complex.
I am sending you the digital codes to do it.
Dr. Beaker is stranded without communication. The players need to
reestablish this communication.
Office Space (Room 1)
The players start in a room themed as standard office space. Simple office
materials (desk, table, chairs, bookshelf) set the theme.
The players start with a packet of material sent from Dr. Beaker. Other
clue puzzles, particularly those that are paper based or require a flat
surface, may also be placed around the room.
Reestablishing Email (Box 1)
Using clues from the package provided by Dr. Beaker’s package, the players
reestablish communication by connecting to her secret email.
Suggested Puzzle: The package contains a piece of paper containing a
QR fold-in. When scanned, the solved QR code sends a player’s phone to an
online document or web document that has an email from Dr. Beaker with
further instructions to find a formula for virus treatment and break into
her private lab.
From: Dr. Susan Beaker <susan.beaker@ccd.gov> To: Virus Research Team <research-staff@ccd.gov> Subject: Please help
Good job! You have reestablished my connection to our communication and
research notes. Since General Halftrack isolated me 3 days ago, I have
been desperate for help.
To start, I need you to find the formula to the virus treatment that I
developed merely 2 day before I left for this emergency trip. Sensing
danger, I locked away my notes, and it appears I was right to do so. I
cannot give you instructions directly over this insecure channel, but you
are clever and I know you will figure it out.
Next, I need you create a secure cryptographic link to me so that we can
talk more freely. This can only be done from within my private lab. My lab
is locked, so you will have to break in.
These 16 weeks on the road have been exhausting, and I’m so glad to be
able to talk to you again.
–Suzzy
Getting the Formula (Box 2)
Per Dr. Beaker’s email, the players need to find the formula for treatment.
Because the email is not secure, Dr. Beaker cannot overtly say how to get
the formula. But the email contains a hidden code that is used to open a
box revealing some of Dr. Beaker’s lab notes containing the formula (and
multiple other items used later).
Suggested Puzzle: Dr. Beaker’s email contains a hidden message with a code
to the box containing her formula. The previously shown message fits will with
the number words puzzle. This online
document can be a target for this
puzzle.
Once open, the box contains lab notes describing a formula Dr. Beaker has
been working on such as this.
Lab notes of Dr. Susan Beaker
We have made good progress on a formula to reduce respiratory infection in
patients. The compound includes the following elements.
Sodium
Bromine
Mercury
Boron
The formula is currently unstable, but we have high hopes to stabilize the
compound.
Finding the Doctor’s Stash (Box 3)
Dr. Beaker has hiding a secret stash of “oregano.” She has also misplaced
some critical items that the players need with this stash, so they will
have to find it.
Suggested Puzzle The crossword lookup puzzle works well here. The
crossword itself can be simply found in the room as something someone
randomly left. A player can solve the crossword while others solve other
parts. You will likely need to create a custom crossword to match some
sequence of items in the room.
The resulting code opens a box containing some items required for later
puzzles. I personally also place a small baggie of oregano, which has no
practical value but adds some humor.
The Doctor’s Lab (Room 2)
According to Dr. Beaker’s email, the players need to break into the lab.
The lab is a second room behind a locked door. The players will have to
solve a puzzle to unlock the door to this room.
The room itself should be themed like a laboratory. It can have props like
flasks and tubes that are reminiscent of a lab. More puzzle pieces and
boxes are placed in this room.
Suggested Puzzle The stick word grid puzzle can be used here. The sticks
can be hid in box 3 and/or others, and the formula gives the arrangement of the
sticks. In the example of the formula above, players can translate the names of
the elements and convert them to element symbols. (A periodic table should be
provided for reference.) I used the list of symbols above to arrange the sticks
below to spell out a message with a numerical code.
Random Lab Stuff (Box 4)
Not much to advance the plot here. The players rummage through the lab to
find more clues.
Suggested Puzzle You can use a paper segment display to provide a
code. The coded pattern can be provided in a box in the previous room, and
the decoder device in the room.
A Mutation (Box 5)
On entering the lab, the players search around to find notes from Dr.
Beaker about the progression of the NEONORO virus.
Suggested Puzzle One of the items in the lab is a container
containing a key and a faux caustic liquid. The players must fish the key
with a magnet provided in a previous box.
Along with other clues, this box contains a note with progression of the
NEONORO virus and further instructions.
I have discovered something very strange about this recent mutation of the
NEONORO. We are starting to see some very unique behavior.
I need to talk to you securely. Hack into our encrypted system so that we
can send messages freely.
Suzy
Email Login Page (Box 6)
The players must find a way to log in to Dr. Beaker’s personal email.
Suggested Puzzle The note about the mutation contains a QR code that
links to an email login form. The username is provided and the players
must fill out the password.
However, there are no clues about what the password might be, and there is
no logical answer. This is an example of a pointless form, and attempting
to guess a password is pointless. Instead, players need to notice the
Reset Password link, which will take them to the correct form.
Survival Kit (Box 7)
The NEONORO virus is about to get much worse. The players need to open a
survival kit. The kit contains foam dart blaster toy guns and part of the
final clue to the exit door.
Suggested Puzzle You can use a jigsaw holes puzzle for this box. The
base board would be placed in the first room, and the first part the fill
pieces are in an early box. This gives the players an early chance to get
started and might result in a fake code. A final group of puzzle pieces
in box 4 reveal the final code.
Zombies! (Box 8)
The players must hack into Dr. Beaker’s personal email to get private
messages. Once they do so, they can get important information directly from
Dr. Beaker.
Suggested Puzzle The result of box 6 is a reset password form that
provides a backdoor to accessing the email without knowing the password.
The reset form has 3 typical questions:
What are your favorite FOODS?
What MONTH were you born?
What is the name of your CHILD?
The players don’t directly know the answers to these questions, but there
is a clue to help them figure it out.
Throughout the game the players have been collecting Styrofoam cups with
letters written around the rims. At this point in the game, the players
have collected 5 such cups. When stacked together, the cups form a
cryptex.
The players need to stack the cups in the right order and twist the cups so
that the highlighted words in the security questions, FOODS, MONTH, and
CHILD, are spelled on the cups. The remaining letters form the words of the
answers to the security questions: CANDY, MARCH, and TYLER.
Once the players enter these words in the reset password form, they are
taken immediately to a secure note from Dr. Beaker. At the bottom of the
note the code to a box of physical items.
From: Dr. Susan Beaker <susan.beaker@cyberdyne.gov> To: Virus Research Team <research-staff@ccd.gov> Subject: Zombies!
Thank goodness you were able to get into the lab and access our secure
communication system! I have a lot to tell you that you must keep secret.
My investigation of NEONORO patients has revealed something startling. We
all know that 5-10% of patients develop serious respiratory problems. But
this turns out to be only a minor side effect of the disease. The true
nature is much, much worse.
We have found that the virus lies dormant in seemingly healthy patients.
Over the course of about 6 months the virus mutates, and its behavior
changes. At this point, the disease attacks the cerebrum, drastically
reducing cognitive function. From there, the virus rapidly progresses to
the adrenal glands, which respond by generating capacious amounts of
cortisone and adrenaline. At this point, the patient becomes mindlessly
aggressive.
For lack of a better term, these victims are turning into zombies. They
ruthlessly attack any living thing within reach. And as they salivate and
bite, they continually spread the disease to other victims. I estimate we
have about 4 days to contain this before we have a global disaster.
Keep this on the down low! In particular, I do not trust General Halftrack.
The behavior of this virus suggest there might have been some military
engineering behind it.
Fortunately, I have prepared for this (rather predictable) event. I
stockpiled some supplies in the laboratory. Unfortunately, I don’t remember
where I put everything. Start by looking in my briefcase. The code is 4288.
Once you have gathered everything, I need you to come to me. Hurry!
–Suzzy
Find Dr. Beaker (Exit)
The final challenge of this escape room is to meet up with Dr. Beaker so
that she and the players can together battle the NEONORO virus raging the
planet. This will set the players on a globetrotting adventure following
her steps.
Suggested Puzzle To find Dr. Beaker, they have to follow the path she
made while in the field investigating the virus. The map trace puzzle
allows players to do this. In the room is a provided map of the world. This
can be a printed poster, a globe, or board from a game that is played on a
map.
Scattered in boxes around the room are clues on the locations Dr. Beaker
has visited, perhaps in the form of airline tickets with departing and
arrival locations. The players have to put these locations together in the
proper order and then trace that itinerary on the map. The directions
provide the code for a directional lock on the exit door.
Attack! (Bonus)
Once the players solve the final puzzle and open the exit door, they have
completed the escape room. As a fun (optional) bonus reward for completing
the room, the players get to shoot their way through an onslaught of
zombies.
To set this bonus up, place some foam dart blaster toy guns (such as Nerf
guns) in the survival kit. Also, print up some pictures of zombies and
post them on the far side of the exit door. When the players open the exit
door and see the zombies, you can ramp up the tension by yelling. “Oh, no!
Zombies. Quick, grab your guns. Shoot your way out!” At this point, the
players are free to get rambunctious in running around and shooting
targets.
There is no additional puzzle in this activity. But this is a very fun way
to end the challenge of your escape room.
Flow Diagram
The materials and suggested puzzles of this escape room follow the
following flow diagram.
Here is a list of equipment you will need if setting up your escape room in
the same way as described above. This is organized by the items in the flow
diagram above. Where possible, I have provided material for you.
Starting packet contents (handed to players at start)
Clue 1.0.1: A copy of the Periodic Table of
Elements. It can be a
poster mounted on a wall or a paper available elsewhere. Free printable
versions are available on the web.
Translate the element names in the formula (Clue 1.2.1) with the
periodic table (Clue 1.0.1).
Arrange the popsicle sticks (Clue 1.3.1) so that the top element symbols
match the translated list in the formula.
The letters of the formula are put together to form a message: N I Ne F O
U R Ni Ne O Ne -> NINe FOUR NiNe ONe
Answer: 9491
Items:
Clue 2.0.1: Acid beaker (A vase or other container with an opening too
small to reach into the bottom. In the container is some water and a key.
Under the container is a note warning/instructing
players not to move or empty the container, which would be cheating.)
Place some pictures of zombies outside of the exit door.
Players grab the foam dart guns (Clue 2.7.2) and shoot at the zombie targets
as they “fight” their way to Dr. Beaker.
Ghost Chasers
Synopsis
Ghost Chasers is an escape room that puts players in the role of
paranormal investigators. The room has plenty of puzzles, fun theming, and
multiple developments in the plot. When creating the puzzles for this room,
I incorporated ideas from actual tools used in paranormal investigations.
Whether you believe in them or not, it is fun to pretend.
The game is divided into two spaces. The first space features a dining
table with place settings. A dining area is perfect for this space. The
second space represents the spirit world. It should be a dark space with
spooky lighting and decorations. Black lights and Halloween decorations
work well here. The flow diagram and setup are at the end of this page.
The setup also has materials you can use to help you build the puzzles.
Also at the bottom is an audio quick reference that you can use as a
game master to have audio cues available to play at events.
Scenario
You (the players) are paranormal investigators. Yesterday, a desperate
voice on the phone called you to a mansion on the outskirts of town. When
you arrive, the door pushes open when you knock, but your host is not there
to greet you. When you step inside, the door slams shut and latches behind
you. A moment later, candles flicker to life on their own. The room looks
normal, but the lack of living people is unnerving. You can feel that there
is something wrong.
It is time to get to work. Collect the tools of your trade and investigate
what spirits may be infesting this site.
Living Space (Room 1)
The players start in the normal living area of a home. The space is
intended to be the area of a house where one might meet guests. A dining
room works well for this space.
The room should contain a table with several place settings of plates,
glasses, forks, knives, etc.
Start Tool Collection (Box 1)
The players get together their ghost hunting tools. This first box
collects items for opening up the tool boxes.
Suggested Puzzle Mounted on one wall is a sequence of digits. Mounted
on the opposite wall is a mirror. The players need to solve a reflected
code puzzle by positioning themselves to view the digits in the mirror.
The mirror reflection has the correct code to open the lock.
Ectoplasm Reveal Tool (Box 2)
The players collect some tools they need for their task. The first tool on
the list is an “ectoplasm reveal tool.”
Suggested Puzzle The cutlery in the place settings on the dining
table look normal. But on the underside of the knives are letters. The
letters will make little sense at first, but the knives can be put together
in a stick word grid. The words spell out a message that points to a
location for players to find a key where they normally would not look. I
made the message “look under chairs”.
The key opens a box that contains, among other things, an “ectoplasm reveal
tool” (an ultraviolet light). It will be used later to reveal secret
messages.
EMF Tool (Box 3)
Another tool the players collect is an electromagnetic frequency (EMF)
detector. An EMF detector reads emissions that come from electric power
lines and electric devices. Some paranormal investigators believe that
ghosts can emit electromagnetic radiation and use EMF detectors to attempt
to find ghosts.
Suggested Puzzle Create an imitation EMF that contains a map of the
room that points to the location of a hidden object. The item might be a
key, which is easy to hide, that opens a larger box.
I created the map as a simple web site that imitated the EMF tool and
provided the map. There are straightforward tools for publishing web
sites even for users with no such experience. An even easier solution is
to drop a map image as an online document.
A QR code is used to direct players to the online map. I used a QR Cube,
but any QR puzzle would work.
EVP Tool (Box 4)
The players search for an electronic voice phenomenon (EVP). EVP is a real
thing that paranormal investigators do. The idea is to do an audio
recording in a quiet room. Then you play back the recording and listen for
stuff in the background static. (Our pretend tool will work better than in
real life.)
Suggested Puzzle The first step is to have a QR construction puzzle
that will make a players phone EVP recorder. Here is a fold back QR
puzzle from box 1 with a QR code that will take players to an EVP
simulator.
In the EVP simulator, players first have to hit the “Record” button and
then wait for the recording. Players will then be able to play back the
recording. They will first have to hit the “Vol Up” button until the volume
level is high. Once they do, they can play the following audio.
If the players listen carefully, in the static they can hear the numbers
six-six-four-three, which form the combination to the box’s lock.
The box contains an encoding for astrological symbols, which will be used
in a later puzzle. The encoding can be embedded in its
own symbol algebra.
♉ + ♉ + ♉ = 9
♉ + ♑ + ♑ = 13
( ♉ × ♑ ) - ♐ = 13
♉ + ♑ + ♐ + ♐ + ♍ = 13
The answers to this puzzle ♉-3, ♑-5, ♐-2, ♍-1. If you don’t think the
players will enjoy doing math homework, you can alternatively just give a
straight lookup.
♍
♐
♉
♊
♑
♎
♓
Research (Box 5)
The players collect some research materials. In particular, they find an
article about dream analysis that will be useful later.
The players also find an enigmatic list of phrases.
Secrets to Long Life
Be Loving
Reap Compassion
Laugh Madly
Murder Kindly
Suggested Puzzle Players have to find printed messages underneath or
on the underside of the plates in the place settings. The message
initially does not mean anything, but a further clue is revealed with the
UV flashlight (ectoplasm tool).
There are at least two ways to set up this puzzle. If you have a word lock,
print a single word under each plate to form a meaningless phrase, and then
circle one of the words with an invisible ink pen. The players must
reveal the word with the UV flashlight and use that word on a lock.
If you prefer to use a number lock, print a single digit under each plate
and place them in random order. In invisible ink, write numbers to
indicate the order of the digits to form a code for a lock.
Summon Lizzy (Box 6)
The players use the tools at hand to summon the spirit that is haunting
this house. The players are contacted by a spirit who identifies itself as
“Lizzy.” In the box have a picture of Lizzy. (The picture can be of any
innocent looking girl. Find a random picture on the internet or that comes
with a photo frame.) The picture comes with the following message.
Help! I’m Lizzy and I think I may have been murdered. Now I’m stuck in this
limbo space: not alive, not dead. If I don’t escape soon, the wraiths will
steal my soul forever. Open the portal to the spiritual world, release the
spirit, and save my soul!
After the players open this box, you can play this audio file (for example,
from a smartphone) to reinforce the situation.
Additionally, players find an excerpt from Lizzy’s diary.
Dear Diary,
Today was the best Day of my life. I met the man of my dreams: Todd. We met
at the park. He was walking his ferret. I was hiding in the bushes. He is
sooooo cute with his pouting Lips and big brown Eyebrows. I didn’t have the
courage to talk, but I did find out where he lives. Tomorrow, we’ll “meet”
again. I’ll bring Mr. Knife for luck.
Suggested Puzzle The players summon Lizzy with a Ouija board. You can
simulate this by shining the UV flashlight (ectoplasm tool) on a provided
Ouija board. The revealed ink shows the path of the entrance code word.
You could probably construct this puzzle with a store-bought Ouija board.
But if you are cheap, like me, you can just print the pattern of a board
on a piece of paper. When I originally did this, I first attempted to print
an image of a board. This, however, did not work because the invisible ink
pen smeared the printer ink just enough to make out the path of the ink.
Instead, you can use this replica of a Ouija board with a blank
background so you can draw in the blank space between letters.
Learn Reiki (Box 7)
The players discover Reiki healing movements helpful for their goals.
Reiki is an alternative medicine technique based on energy flows through
the body. Part of Reiki involves moving your hands in various patterns to
manipulate these energy flows.
This box has several Reiki patterns for the players’ reference.
Reiki is really a healing technique, not something that meant to unlock
doors. But I think it is safe to say it works equally well for either.
Suggested Puzzle This box opens up with a code-word lookup puzzle. First,
Lizzy’s diary (from box 6) has several words with odd capitalization:
Day, Lips, Eyebrows, and Knife. The players need to match these with the
word lists in the paper from box 5. These words translate to the numbers
4 4 8 2.
Spirit World (Room 2)
The second room represents the spirit world. This room should be spooky and
contain ghostly decorations. Decorating this room is a chance to be
creative. Halloween decorations can work well here. Making the room dark
matches the theme, but make sure there is enough light to see the puzzles
and avoid any tripping hazards.
Suggested Puzzle Of the symbols provided in box 7, one of them is
labeled “open dimensions.” This is a clue that this symbol is used to open
the portal (i.e., door) to the spirit world.
The symbol has ordered arrows giving the proper directions to replicate
this symbol. The players must replicate these directions on a directional
lock to open the door. This is a form of the sketch directions puzzles.
Astrology Reading (Box 8)
The players consult astrological charts to help them in their quest.
(I am unaware real paranormal investigators using astrology, but I think it
meets the theme well.)
Suggested Puzzle Inside the spirit world is this map of the night sky
with astrological symbols on it.
This map should be printed as large as possible (either on a poster or on
multiple pieces of paper) to see its small features.
This map combines with the list of items in box 5 to form a grid
lookup puzzle. The items in the list are “Be Loving”, “Reap Compassion”,
“Laugh Madly”, and “Murder Kindly”. Focusing on the first letter of each
phrase, we get B-L, R-C, L-M, and M-K. If we look up these pairs on the
map (looking at columns first), we see that they point to the astrological
symbols ♉, ♍, ♑, and ♐.
This still does not provide the code. These astrology symbols must be
turned into numbers using the clue provided in box 4. This box either
directly has the conversion of symbol to number or has a symbol algebra
puzzle to assign a number to each. In the numbering provided in the
examples above, these symbols translate to the
code 3152.
Banishment Potion (Box 9)
When the players open this box, they find the instructions to create a
banishment potion. When the players open this box, they get a potion recipe
like this.
Banishment Potion
Ingredients
2 tablespoons Pus
4 sprigs Sneezewort
1 cup Urine
5 Tubeworms
3 Cockroaches
Directions
Melt pus in a large saucepan. Chop sneezewort and add to pus. Sauté until
sneezewort is soft. Add urine and bring to boil. Dice tubeworms and add to
urine/sneezewort mixture. Return to boil, reduce heat, cover, and simmer
for 15 minutes.
Pour mixture into a small trifle bowl. Slice cockroaches lengthwise and
arrange on top in a pentagram.
Suggested Puzzle The banishment potion box can be opened with a code
provided by the tea light message puzzle. The tea light is placed on the
table in the first room and is lit as the players walk in. By the time the
players open the second room where this box is, the code should be visible
in the candle. The players just have to find it.
Lizzy Unchained (Box 10)
The players free the trapped soul, Lizzy, who pleaded for help (box 6).
However, as soon as the players succeed in releasing Lizzy, she reveals
herself as a malevolent spirit intent on committing evil.
When players unlock this “box,” a horrible figure drops from the ceiling.
(The puzzle is set up as a hanging boss. A Halloween decoration of a
ghost works well for the figurine of Lizzy.) When Lizzy unfurls, a note is
also dropped revealing her true nature.
Fools! Now that you have opened the portal, I will unleash hell upon the
Earth!
When Lizzy is revealed, you can also play an audio file to pump up the
drama.
Also dropping from Lizzy is a list of potion ingredients. This is a long
list of weird ingredients, each with a random digit next to it.
Suggested Puzzle The clue to unlocking Lizzy unchained is provided by
the EMF tool (box 3). I used the groovy blocks puzzle. This is a tricky
puzzle, but providing the blocks early in box 3 will give players some
more time to work it out.
Spirit Box (Box 11)
A spirit box in another device that paranormal investigators will use. It
is an electronic device that makes a cyclic static sound and occasionally
barks out words. What the spirit box is doing is quickly cycling through FM
radio channels. It’s basically a digital FM radio with the tuner up button
held down. As the radio scans through frequencies, it occasionally picks up
a sound. Some people think this is spirits trying to communicate. (Others
think it is a radio making sounds like radios do.)
Suggested Puzzle Like the other tools, the spirit box is emulated on a
player’s phone and accessed through a QR code. Thus, a QR construction
puzzle is appropriate. You can use a jigsaw QR puzzle here. The following
QR code with the suggested cutout pieces works well.
These puzzle pieces come from box 8 (and possibly others).
Lizzy Defeated (Box 12)
The players concoct a banishment potion and apply it on the evil spirit
Lizzy. On solving the puzzle, the players unlock the second part of the
hanging boss. Lizzy falls to the ground, defeated. When Lizzy falls, you
can play this audio file.
But this is not the correct order of the digits. Each ingredient has a
quantity containing a number. The ingredients need to be listed in the
order of these numbers: 1-Urine, 2-Pus, 3-Cockroaches, 4-Sneezewort,
5-Tubeworms. This order yields the correct code: 51029.
Escape House (Exit)
With Lizzy defeated, the players must close the connection to the
metaphysical world and unlock the door to the outside world. Then they can
emerge from the house victorious.
Within this sound, words can be discerned: Evil, Gore, Blood, Pickles. In
another variation of the code-word lookup puzzle, these words are
cross-referenced in Lizzy’s shopping list from box 12. This provides
the digits 8, 3, 1, and 4, which form the proper code 8314.
Flow Diagram
The materials and suggested puzzles of this escape room follow the
following flow diagram.
Here is a list of equipment you will need if setting up your escape room in
the same way as described above. This is organized by the items in the flow
diagram above. Where possible, I have provided material for you.
Over time, a code appears in Clue 1.0.1. (Make sure the candle stays lit
until the code is found. If the players blow it out, relight it and say
the candle relights on its own.)
Listening to Clue 2.11.1, 4 words are discernable: Evil, Gore, Blood,
Pickles.
Look up these words in Clue 2.12.1.
Answer: 8314
Audio Quick Reference
As the players progress in the game, there are some audio files you can play at
certain events to add ambience. Here is a quick reference tyo play each file.
Box 6: Summon Lizzy opened (Lizzy asks for help) (Download)
Box 10: Lizzy Unchained (Evil Lizzy is revealed and threatens players) (Download)
Box 12: Lizzy Defeated (Lizzy is defeated and falls to the ground) (Download)
About
Thanks for visiting this site!
The Open Sesame web site is my hobby. My family and I have been enjoying
our at-home escape rooms for several years. I post these pages of ideas in
hopes that you find them fun and helpful.
On the following pages you will find meta information about this site.
For attributions or to inquire about alternate license, see the
contact page.
Additionally, all content is provided “as is,” and any express or implied
warranties are disclaimed. In no event shall the copyright holder be liable
for any direct, indirect, incidental, special, exemplary, or consequential
damages.
This license does not extend to any third-party material. This site has no
affiliation with any brands, products, or resellers. Any reference is
provided for example purposes only and not an endorsement or opposition.
Links
If you have enjoyed the content on this page, here are some other resources
you may find useful. This is by no means intended to be a complete list,
but rather a few related sites to follow.
The Blog of Dr. Moron
(https://www.drmoron.org/) This site contains the blog
post that got me started
down the path that lead to this site. There are also several unrelated
but similar posts you may find interesting.
teambuilding.com
Blog This site
providing team building exercises features a blog post with several ideas
for in house escape rooms.
Escape This Podcast
(https://www.escapethispodcast.com/) Taking a different approach, this
podcast features a cross between escape rooms and tabletop roll playing
(like D&D). The podcast recordings feature a person working through the
puzzles they have made. The site also provides all the materials
prospective dungeon masters need to host other players.


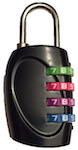
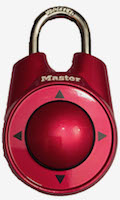
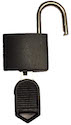
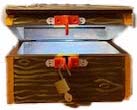


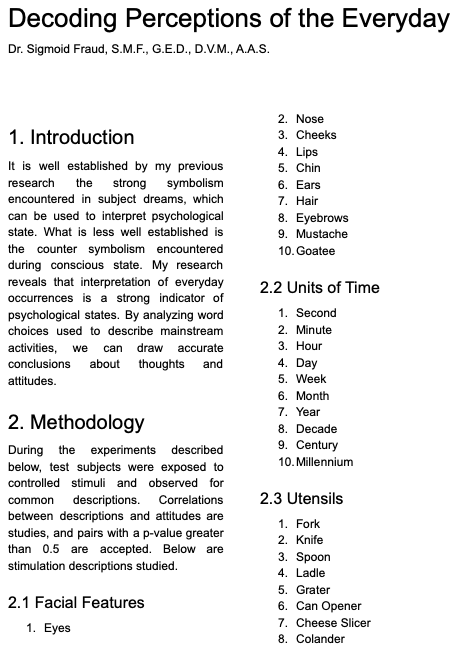


 ,
,


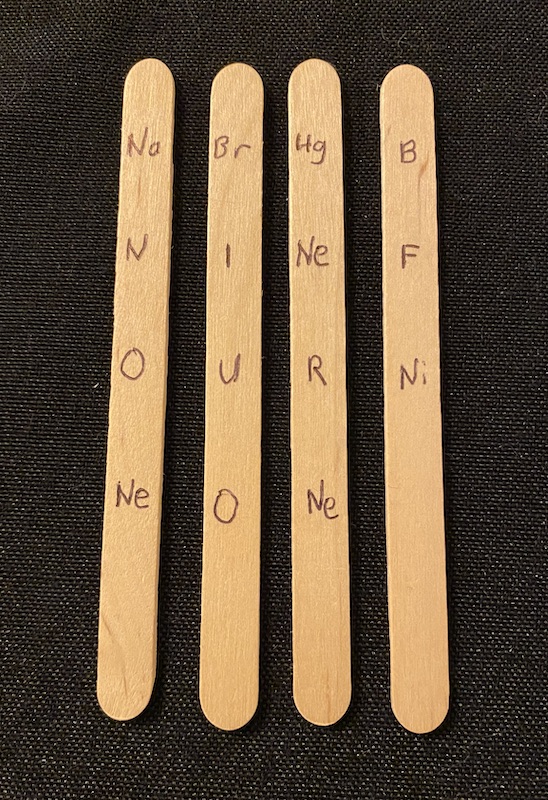
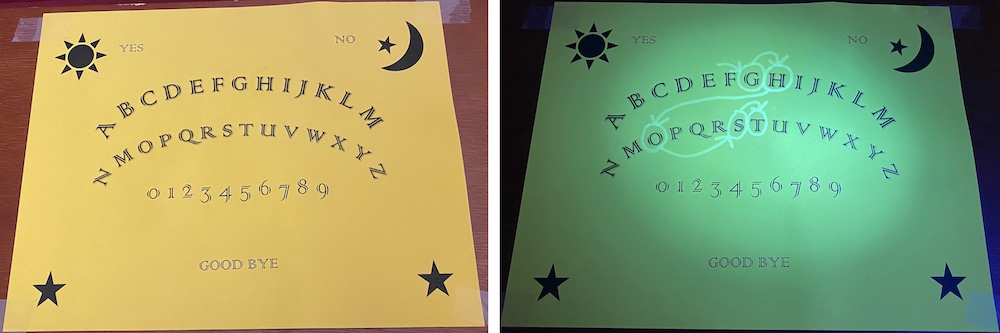